OAuth 2.0 AuthorizationServer Endpoint 기능 및 특징
OAuth2AuthorizationEndpointConfigurer
OAuth2 권한 부여 엔드포인트에 대한 사용자 정의 할 수 있는 기능을 제공한다.
OAuth2 권한 부여 요청에 대한 전처리 , 기본 처리 및 후처리 로직을 커스텀하게 구현할 수 있도록 API를 지원한다.
OAuth2AuthorizationEndpointFilter 를 구성하고 이를 OAuth2 인증 서버 SecurityFilterChain 빈에 등록한다.
OAuth2AuthorizationEndpointFilter
OAuth2 인증 요청(및 동의)을 처리하는 필터이며 다음과 같은 기본값으로 구성된다.
OAuth2AuthorizationCodeRequestAuthenticationConverter = 클라이언트 요청 파라미터를 OAuth2AuthorizationCodeRequestAuthenticationToken 으로 변환하고 AuthenticationProvider에게 전달한다.
OAuth2AuthorizationCodeRequestAuthenticationProvider = Authorization code권한 부여 방식을 처리하는 OAuth2.0 인증 요청 및 동의에 대한 AuthenticationProvider 구현체이다.
RequestMatcher
Code 요청 패턴 = /oauth2/authorize , GET , /oauth2/authorize , POST
Consent (동의하기) 요청 패턴 = /oauth2/authorize , POST
@Bean
@Order(Ordered.HIGHEST_PRECEDENCE)
public SecurityFilterChain authorizationServerSecurityFilterChain(HttpSecurity http) throws Exception {
    OAuth2AuthorizationServerConfigurer<HttpSecurity> authorizationServerConfigurer =
            new OAuth2AuthorizationServerConfigurer<>();
    RequestMatcher endpointsMatcher = authorizationServerConfigurer.getEndpointsMatcher();
    authorizationServerConfigurer.authorizationEndpoint(authorizationEndpoint ->
                    authorizationEndpoint
                            .authenticationProvider(customAuthenticationProvider)
                            .authorizationResponseHandler(new AuthenticationSuccessHandler() {
                                        @Override
                                        public void onAuthenticationSuccess(HttpServletRequest request, HttpServletResponse response, Authentication authentication) throws IOException, ServletException {
                                            OAuth2AuthorizationCodeRequestAuthenticationToken authentication1 = (OAuth2AuthorizationCodeRequestAuthenticationToken) authentication;
                                            System.out.println(authentication);
                                            String redirectUri = authentication1.getRedirectUri();
                                            String authorizationCode = authentication1.getAuthorizationCode().getTokenValue();
                                            String state = null;
                                            if (StringUtils.hasText(authentication1.getState())) {
                                                state = authentication1.getState();
                                            }
                                            response.sendRedirect(redirectUri+"?code="+authorizationCode+"&state="+state);
                                        }
                                    }
                            )
                            .errorResponseHandler(new AuthenticationFailureHandler() {
                                @Override
                                public void onAuthenticationFailure(HttpServletRequest request, HttpServletResponse response, AuthenticationException exception) throws IOException, ServletException {
                                    System.out.println(exception.toString());
                                    response.sendError(HttpServletResponse.SC_BAD_REQUEST);
                                }
                            })
            );
    return http.build();
}
OAuth2AuthorizationEndpointConfigurer 가 제공하는 메소드들 중에 authenticationProvider , authorizationResponseHandler , errorResponseHandler 를 호출하고 있고
OAuth 2.0 AuthorizationSever Endpoint - 사용자 인증단계
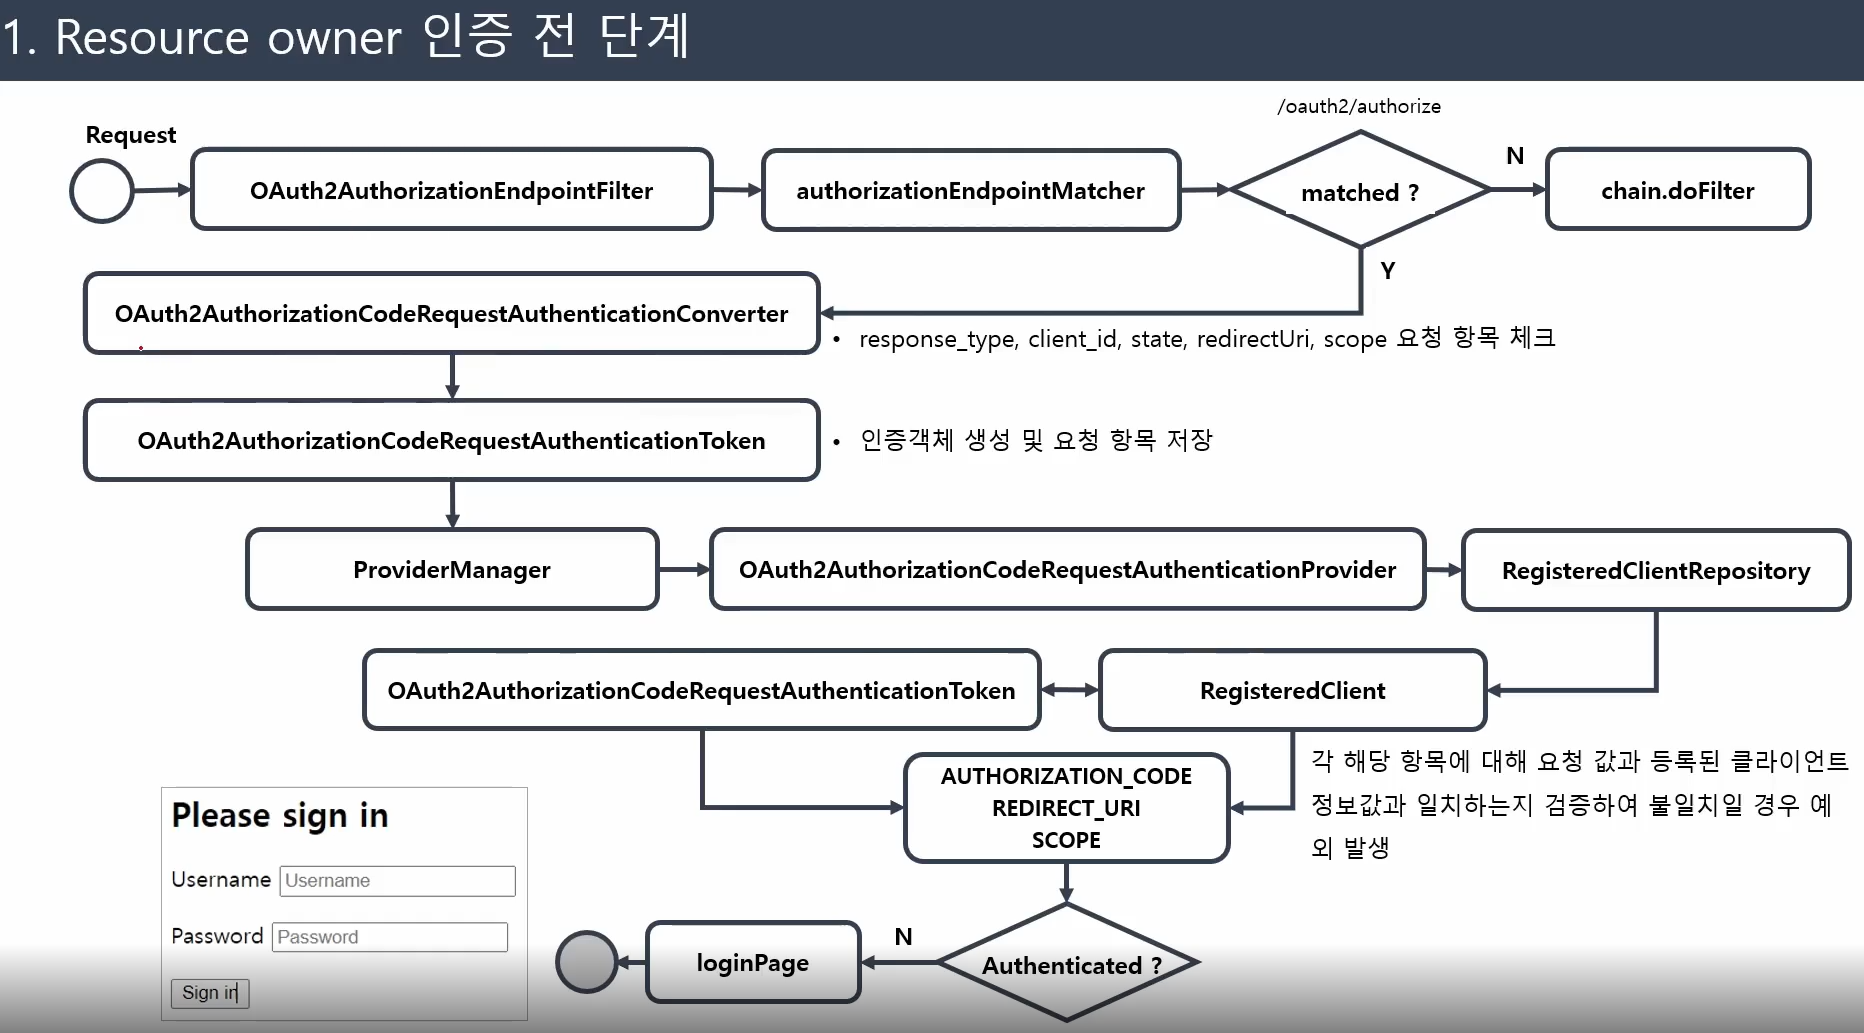
spring security 인증의 공통적인 사항 = 이 패턴을 크게 벗어나지 않는다.
1. filter에서 항상 요청을 처리하게 된다.
2. 특정 filter에서 지정된 url 로 요청이 온것인지 확인한다.
3. request에서 온 인증정보를 Authentication Token으로 만든다.
4. 만든 인증 객체를 ProviderManager에 전달한다.
5. ProviderManager는 AuthenticationProvider 중에 실제 인증객체를 authenticate할 수있는 애를 찾고 위임한다.
6. AuthenticationProvider에서 인증에 필요한 모든 요소들을 검증한고 AuthenticaitonToken을 인증된 상태로 반환한다. 이것은 Filter까지 다시 전달된다.
7. Filter에서 SecurityContext에 저장이 된다.
AuthenticationConverter에서 정확히 필요한 값들이 왔는지 확인하고 (문법체크) AuthenticationToken이 만들어진다.
Provider가 인증을 하는 과정은 auth sever에 등록이된 client를 가져와서 request에서 넘어온 값들이 같은지 비교하면서 이루어진다.
해당항목들이 일치하는지 확인하고 현재 AuthenticationToken의 principal 은 AnonymousUser , 즉 인증이 안되었기 때문에 Resource server에 user가 인증을 할 수 있도록 loginPage로 넘긴다.
OAuth 2.0 AuthorizationServer Endpoint - 동의단계
OAuth2AuthorizationConsent

OAuth2AuthorizationConsent 는 OAuth2 권한 부여 요청 흐름의 권한부여 "동의" (결정)를 나타낸다.
클라이언트에 대한 액세스를 승인할 때 리소스 소유자는 클라이언트가 요청한 권한의 하위 집합만 허용할 수 있다.
클라이언트가 범위를 요청하고 리소스 소유자가 요청된 범위에 대한 엑세스를 허용하거나 거부하는 authorization_code grant 흐름이다.
OAuth2 인증 흐름이 완료되면 OAuth2 Authorization Consent가 생성(또는 업데이트) 되고 부여된 권한을 클라이언트 및 리소스 소유자와 연결한다.
OAuth2AuthorizationConsentService
OAuth2AuthorizationConsent가 저장이되고 조회가능하다.
InMemory, JDBC 버전의 구현체가 존재한다.

form 로그인 방식으로 인증을 시도하고 있기때문에 UsernamePasswordAuthenticationFilter에서 처리를 하고 있다. 인증에 성공하게되면 SuccessHandler에서 사진의url로 sendRedirect를 하게 된다.
그러면 위의 OAuth2AuthorizationEndpointFilter에 또 걸리게 된다. 그럼 마지막 Authenticated?에서 이번엔 form 로그인 방식으로 인증을 했으므로 yes로 빠지게 된다.
open id의 scope는 ConsentPage에 따로 나오지 않는다 (저절로 포함됨). 인증 프로토콜이기 때문이다.

consentpage에서 http://localhost:9000/oauth2/authorize POST 요청으로 날라가게 된다.
OAuth2AuthorizationCodeRequestAuthenticationProvider에서 user 인증 + consent에서 막혔던(바로 return 했었음) 부분을 넘어가고 계속해서 진행하게 된다.
OAuth2Authorization = auth sevrer에서 client의 session -> 여기서 OAuth2AuthorizationRequest는 client가 최초로 요청 한 requet이다.
authorizedScopes의 경우에는 사용자가 실제로 consent page에서 선택한 scope만 담기게 된다. user 가 선택한 scope만 GrantedAuthority로 담기게 된다.
동의하기 과정까지 다 거친이후에 OAuth2AuthorizationCode를 생성하게 되고 저장이 된다.
@Component
@RequiredArgsConstructor
public class CustomAuthenticationProvider implements AuthenticationProvider {

    private final RegisteredClientRepository registeredClientRepository;
    private final OAuth2AuthorizationService oAuth2AuthorizationService;
    private final OAuth2AuthorizationConsentService oAuth2AuthorizationConsentService;
    @Override
    public Authentication authenticate(Authentication authentication) throws AuthenticationException {

        OAuth2AuthorizationCodeRequestAuthenticationToken authorizationCodeRequestAuthentication =
                (OAuth2AuthorizationCodeRequestAuthenticationToken) authentication;

        OAuth2AuthorizationCodeRequestAuthenticationProvider authenticationProvider
                = new OAuth2AuthorizationCodeRequestAuthenticationProvider(registeredClientRepository, oAuth2AuthorizationService, oAuth2AuthorizationConsentService);
        OAuth2AuthorizationCodeRequestAuthenticationToken authenticate
                = (OAuth2AuthorizationCodeRequestAuthenticationToken)authenticationProvider.authenticate(authorizationCodeRequestAuthentication);

        Authentication principal = (Authentication) authorizationCodeRequestAuthentication.getPrincipal();
        System.out.println("principal = " + principal);

        return authenticate;

    }

    @Override
    public boolean supports(Class<?> authentication) {
        return OAuth2AuthorizationCodeRequestAuthenticationToken.class.isAssignableFrom(authentication);
    }
}
@EnableWebSecurity
public class DefaultSecurityConfig {
@Bean
public SecurityFilterChain defaultSecurityFilterChain(HttpSecurity http) throws Exception {
http.authorizeRequests(request -> request.anyRequest().authenticated());
http.formLogin();
DaoAuthenticationProvider daoAuthenticationProvider = new DaoAuthenticationProvider();
daoAuthenticationProvider.setUserDetailsService(userDetailsService());
http.authenticationProvider(daoAuthenticationProvider);
return http.build();
}
@Bean
public UserDetailsService userDetailsService(){
UserDetails user = User.withUsername("user").password("{noop}1234").authorities("ROLE_USER").build();
return new InMemoryUserDetailsManager(user);
}
}form 로그인으로 진행되고 Custom한 Provider를 사용하고 있어서 원래는 기본적으로 추가되는 DaoAuthenticationProvider를 따로 추가해줘야한다. UsernamePasswordAuthenticationFilter에서 쓸수 있게
@Configuration(proxyBeanMethods = false)
public class AuthorizationServerConfig {

    @Autowired
    private CustomAuthenticationProvider customAuthenticationProvider;


    @Bean
    @Order(Ordered.HIGHEST_PRECEDENCE)
    public SecurityFilterChain authorizationServerSecurityFilterChain(HttpSecurity http) throws Exception {
        OAuth2AuthorizationServerConfigurer<HttpSecurity> authorizationServerConfigurer =
                new OAuth2AuthorizationServerConfigurer<>();
        RequestMatcher endpointsMatcher = authorizationServerConfigurer.getEndpointsMatcher();
        authorizationServerConfigurer.authorizationEndpoint(authorizationEndpoint ->
                        authorizationEndpoint
                                .authenticationProvider(customAuthenticationProvider)
                                .authorizationResponseHandler((request, response, authentication) -> {
                                    OAuth2AuthorizationCodeRequestAuthenticationToken authentication1 = (OAuth2AuthorizationCodeRequestAuthenticationToken) authentication;
                                    System.out.println(authentication);
                                    String redirectUri = authentication1.getRedirectUri();
                                    String authorizationCode = authentication1.getAuthorizationCode().getTokenValue();
                                    String state = null;
                                    if (StringUtils.hasText(authentication1.getState())) {
                                        state = authentication1.getState();
                                    }
                                    response.sendRedirect(redirectUri+"?code="+authorizationCode+"&state="+state);
                                }
                                )
                                .errorResponseHandler((request, response, exception) -> {
                                    System.out.println(exception.toString());
                                    response.sendError(HttpServletResponse.SC_BAD_REQUEST);
                                })
                );

        return http.build();
    }
}
CustomAuthenticationProvider는 OAuth2AuthorizationCodeRequestAuthenticationProvider를 그냥 객체로 만들고 authenticate를 위임할뿐 별다른 작업을 진행하지 않았다.
ResponseHandler에서는 consent도 다 끝난후에 code값을 전달하는 과정이다.
OAuth 2.0 Token Endpoint 기능 및 특징
OAuth2TokenEndPointConfigurer
OAuth2 토큰 엔드포인트에 대한 사용자 정의 할 수 있는 기능을 제공한다.
OAuth2 토큰 요청에 대한 전처리, 기본 처리 및 후처리 로직을 커스텀하게 구현할 수 있도록 API를 지원한다
OAuth2TokenEndpointFilter를 구성하고 이를 OAuth2 인증 서버 SecurityFilterChain 빈에 등록한다
지원되는 권한 부여 유형은 authorization_code, refresh_token 및 client_credential이다.
OAuth2TokenEndpointFilter
클라이언트의 토큰 요청을 처리하는 필터이며 다음과 같은 기본값으로 구성된다. 지원하는 3개의 GrantType 별로 Converter와 Provider가 존재한다.
DelegatingAuthenticationConverter - 각 특정 유형의 AuthenticationConverter를 호출해서 처리를 위임한다.
OAuth2AuthorizationCodeConverter - HttpServletRequest 정보를 OAuth2AuthorizationCodeAuthenticationToken 으로 변환하여 반환
OAuth2RefreshTokenAuthenticationConverter - HttpServletRequest 정보를 OAuth2RefreshTokenAuthenticationToken 으로 변환하여 반환
AuthenticationSuccessHandler - 인증된 OAuth2AccessTokenAuthenticationToken 을 처리하는 내부구현체로서 인증토큰을 사용하여 OAuth2AccessTokenResponse 를 반환한다.
AuthenticationFailureHandler - OAuth2AuthenticationException 과 관련된 OAuth2Error를 사용하는 내부구현 인증예외이며 OAuth2Error 응답을 반환한다.
RequestMatcher
토큰 요청패턴 = /oauth2/token , POST
@Bean
@Order(Ordered.HIGHEST_PRECEDENCE)
public SecurityFilterChain authorizationServerSecurityFilterChain(HttpSecurity http) throws Exception {
    OAuth2AuthorizationServerConfigurer<HttpSecurity> authorizationServerConfigurer =
            new OAuth2AuthorizationServerConfigurer<>();
    RequestMatcher endpointsMatcher = authorizationServerConfigurer.getEndpointsMatcher();
    authorizationServerConfigurer.tokenEndpoint(oAuth2TokenEndpointConfigurer ->
            oAuth2TokenEndpointConfigurer
                    .authenticationProvider()
                    .accessTokenResponseHandler()
                    .errorResponseHandler())
위에서 authorizationEndpoint 처럼 tokenEndpoint가 존재하고 설정하는 메소드도 똑같다.
실제로 OAuth2AuthorizationServerConfigurer안에 기본적으로 들어있는 SecurityConfigurer 들 중 하나임으로 사용법이 유사하다
OAuth 2.0 Token Endpoint flow - 클라이언트 인증하기
OAuth2ClientAuthenticationConfigurer
OAuth2 클라이언트 인증을 위한 사용자 정의하는 기능을 제공한다.
클라이언트 인증 요청에 대한 전처리, 기본 처리 및 후처리 로직을 커스텀하게 구현할 수 있도록 API를 지원한다.
OAuth2ClientAuthenticationFilter 를 구성하고 이를 OAuth2 인증 서버 SecurityFilterCain 빈에 등록한다.
지원되는 클라이언트 인증 방법은 client_secret_basic , client_secret_post, private_key_jwt , client_secret_jwt 및 none (공개 클라이언트) 이다.
Oauth2ClientAuthenticationFilter
클라이언트 인증 요청을 처리하는 필터이며 다음과 같은 기본값으로 구성된다.

none을 제외하면 client 인증처리 방법이 총 4가지 임으로 4가지의 Converter와 3가지 Provider(ClientSecretAuthenticationProvider가 basic , post 둘다 담당함) 가 존재한다.
RequestMatcher - 토큰요청 패턴 - POST /oauth2/token , POST /oauth2/introspect , POST /oauth2/revoke

현재 요청은 authorization_code와 함께 client id + client sercet을 보내는 요청이다.
client가 OAuth2ClientAuthenticationFilter에서 인증을 거쳐야지만 FilterSecurityInterceptor를 거쳐서 access token을 요청할때 걸러지지 않는다.
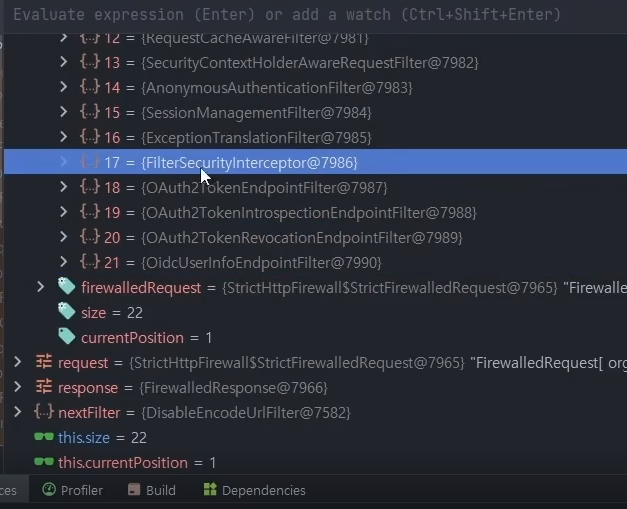
FilterSecurityInterceptor가 인증이 된 요청을 권한까지 있는지 확인하게 되는데 인증이 안된 요청이면 ExceptionTranslationFilter 의 catch문으로 들어가서 인증을 할 수 있게 AuthenticationEntryPoint로 가게 한다.
즉 나머지 4개의 filter가 FIlterSecurityInterceptor 뒤에 존재하니 인증이 된 상태에서만 추가적인 token요청을 진행할 수 있는 것이다.
ClientSecretPostAuthenticationConverter 임으로 post 요청으로 주소는 /oauth2/token + body에 client id , client secret을 담긴 요청이 걸린 것이다.
auth server에 등록된 client가 맞는지? password는 맞는지 확인을 ClientSecretAuthenticaitonProvider에서 하게 된다.
OAuth 2.0 Token Endpoint Flow - Authorization Code 엔드포인트
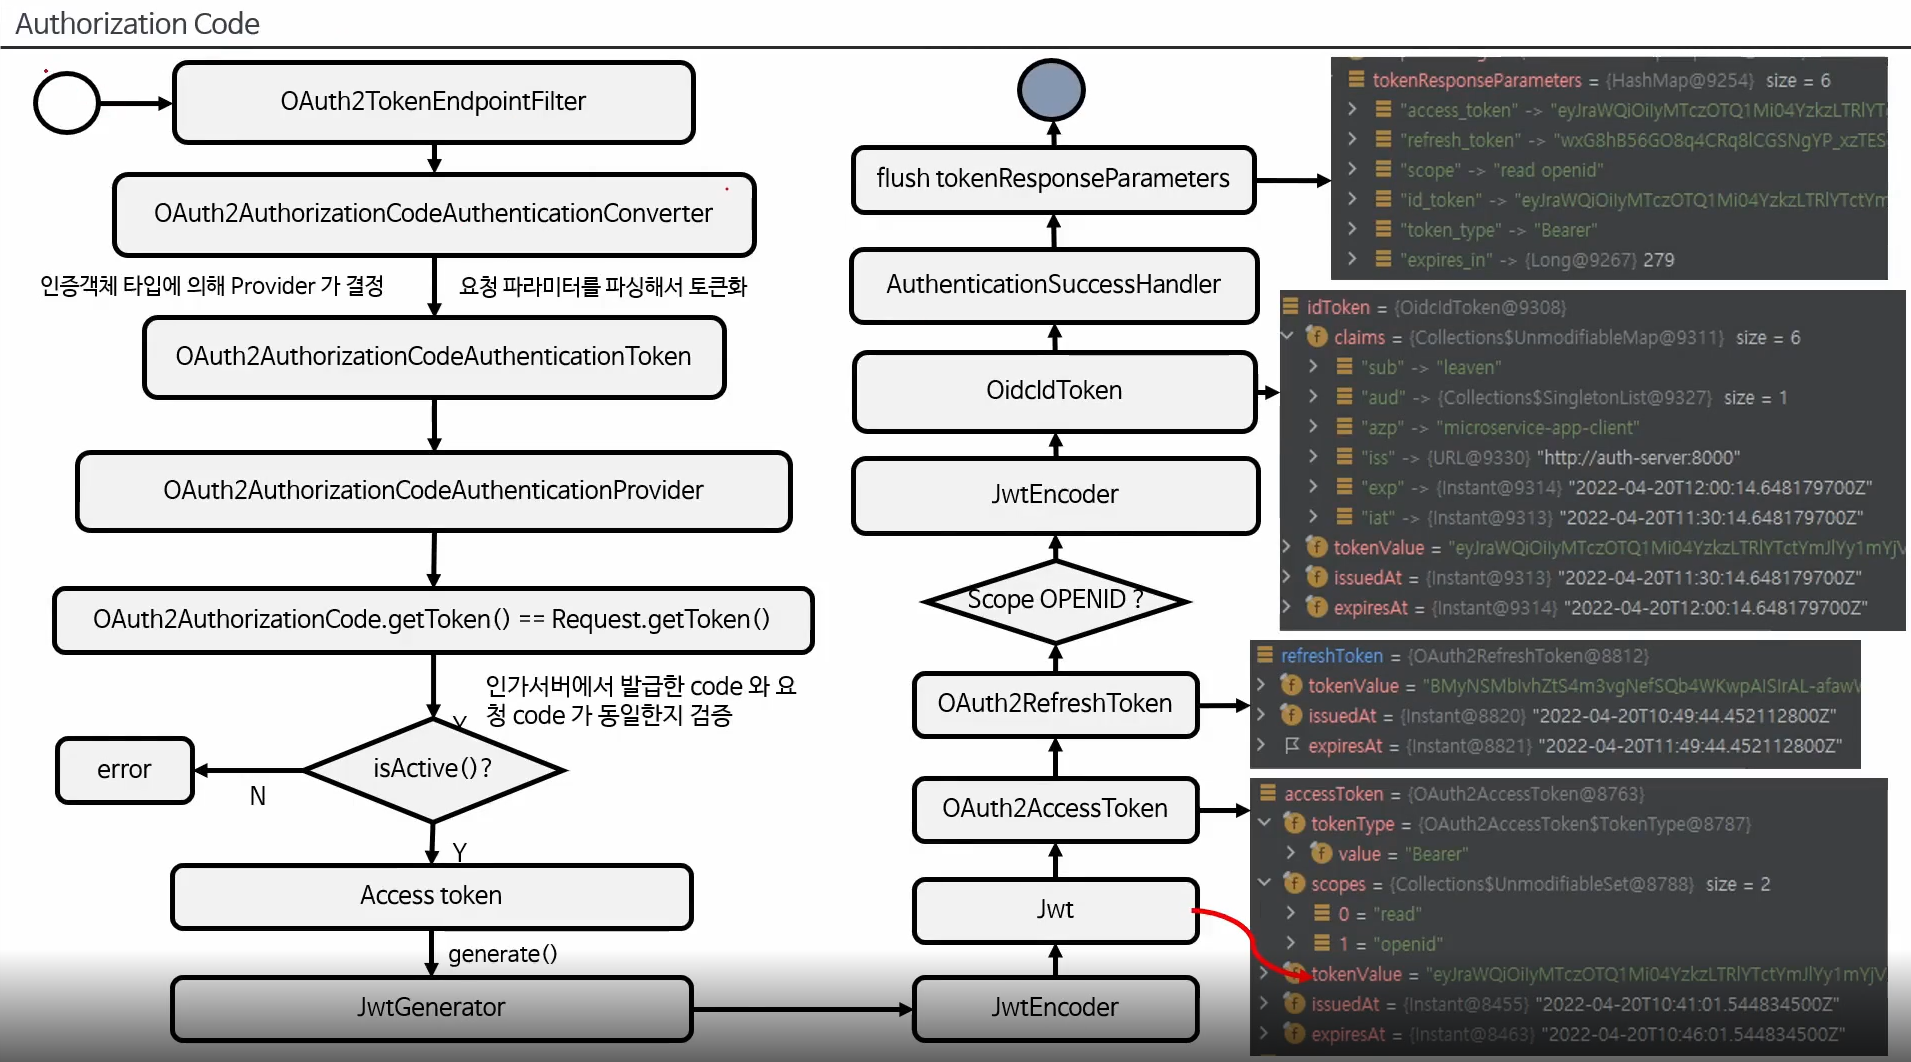
Authorization_code와 함께 온 access token 요청임으로 OAuth2"AuthorizationCode"AuthenticationConverter 으로 빠져서 authenticationToken을 만들게 된다.
authorization_code에 대한 검증이 이루어진다. 한번 사용하면 isActive가 true가 되어서 한번만 사용할 수 있는것을 보증한다.
Filter에서 converter에서 request를 가지고 OAuth2AuthorizationCodeAuthenticationToken 을 만들고 이것을 authenticate해줄 Provider를 찾는다.
OAuth2AuthorizationCodeAuthenticationProvider가 담당하게 되고 여기서 인증을 마치면 OAuth2TokenEndpointFilter로 OAuthAccessTokenAuthenticationToken을 return 한다.
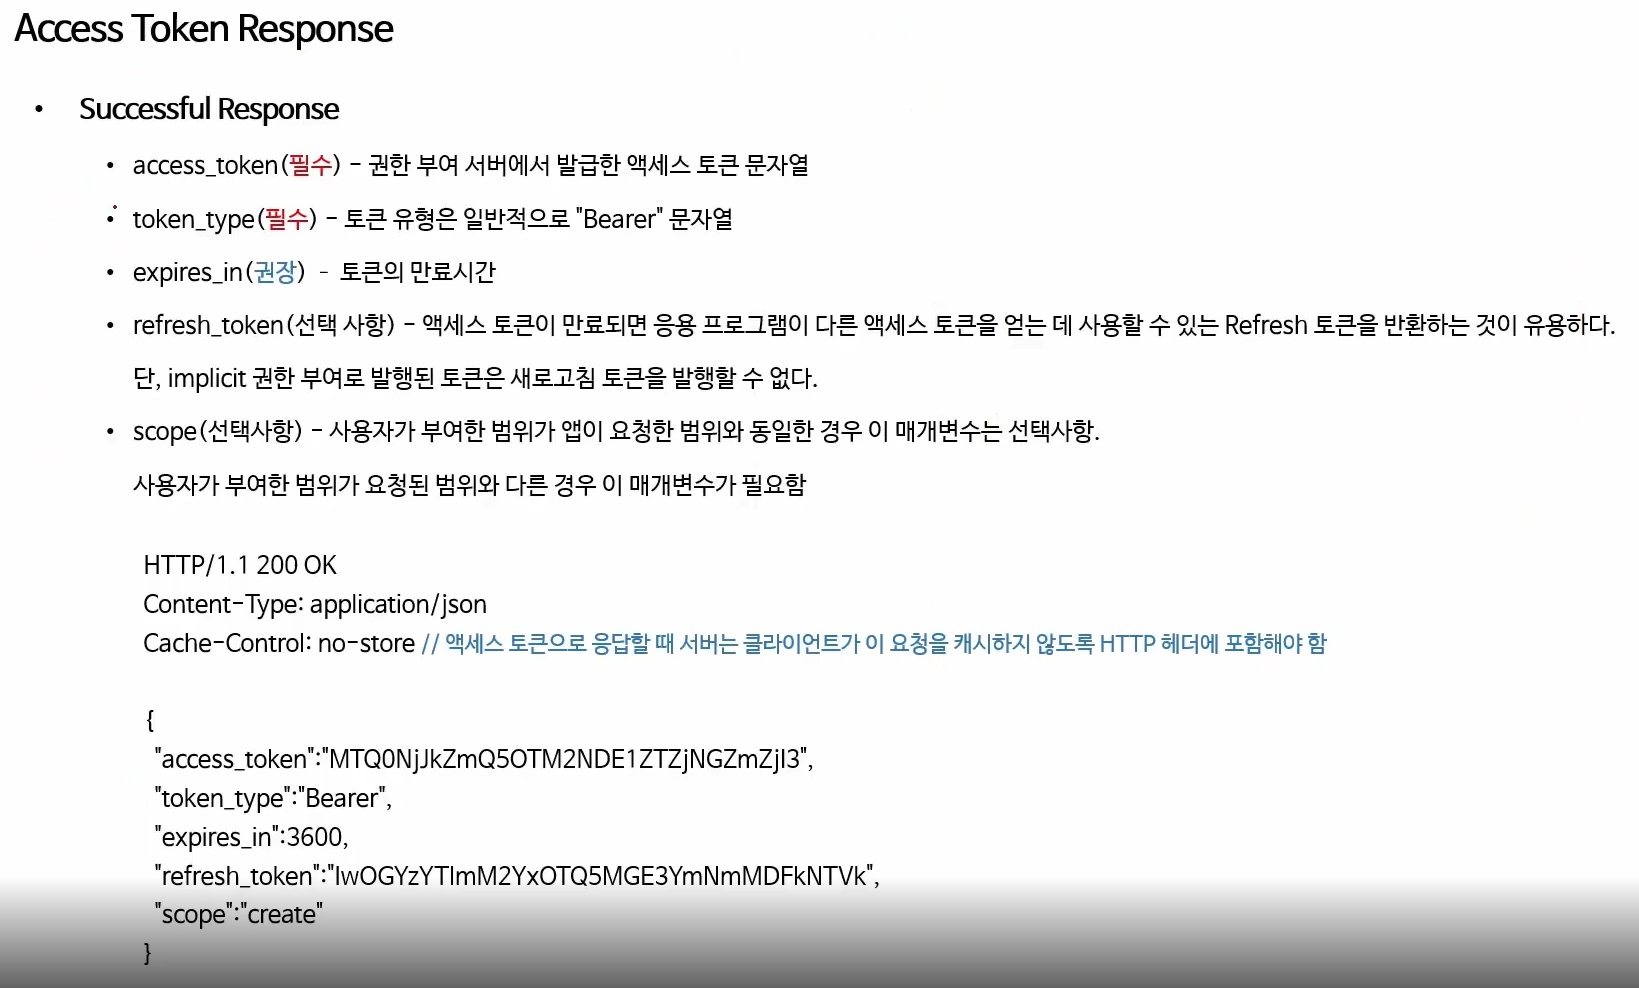
무사히 access token 만드는것을 성공했을시에 보내는 response 양식이다.
왜 Cache-Control: no-store 으로하는가? 어차피 매 요청마다 token과 함께 보내야 하는것이 아닌가? 질문 답변오면 수정하자

여러 요인으로 access token 지급이 불가능한 경우 보내는 Response
1차요청 - auth code 요청을 보낼때 redirect url 을 보내게되는데 2차요청(access token) 시에도 동일한 redirect url을 보내야한다. 안그러면 invalid_grant 가 뜬다.
auth server에 client를 등록할 떄 어떤 권한 부여유형(auth_code ,pkce 등) 을 사용할지 등록하게 되는데 client가 요청을 보낼때 다른 권한 부여 방식으로 요청을 보내게 되면 unauthorized_client 가 뜬다.
이떄 아예 auth server에서 지원하지 않는 권한 부여 방식이면 unspported_grant_type 이 뜬다.
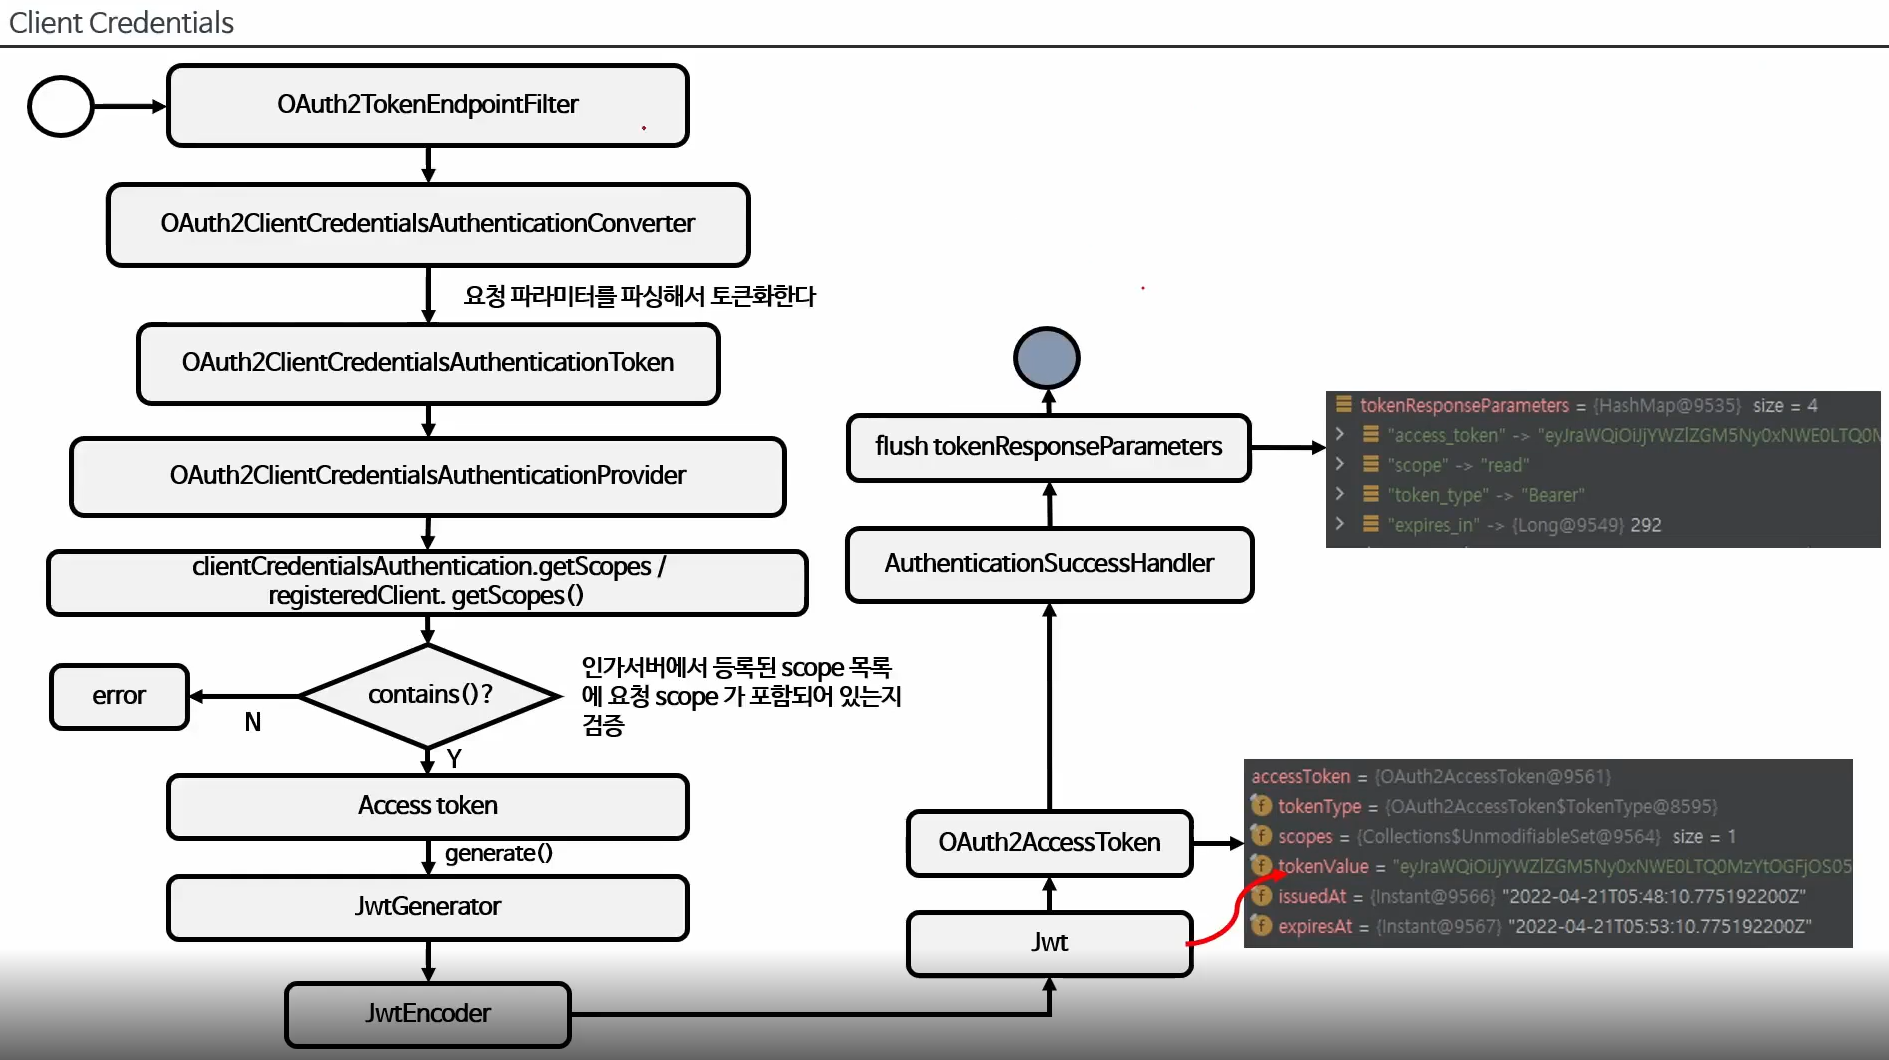
OAuth 2.0 Token Endpoint Flow - Client Credentials 엔드포인트
OAuth 2.0 Token Endpoint Flow - Refresh Token 엔드포인트
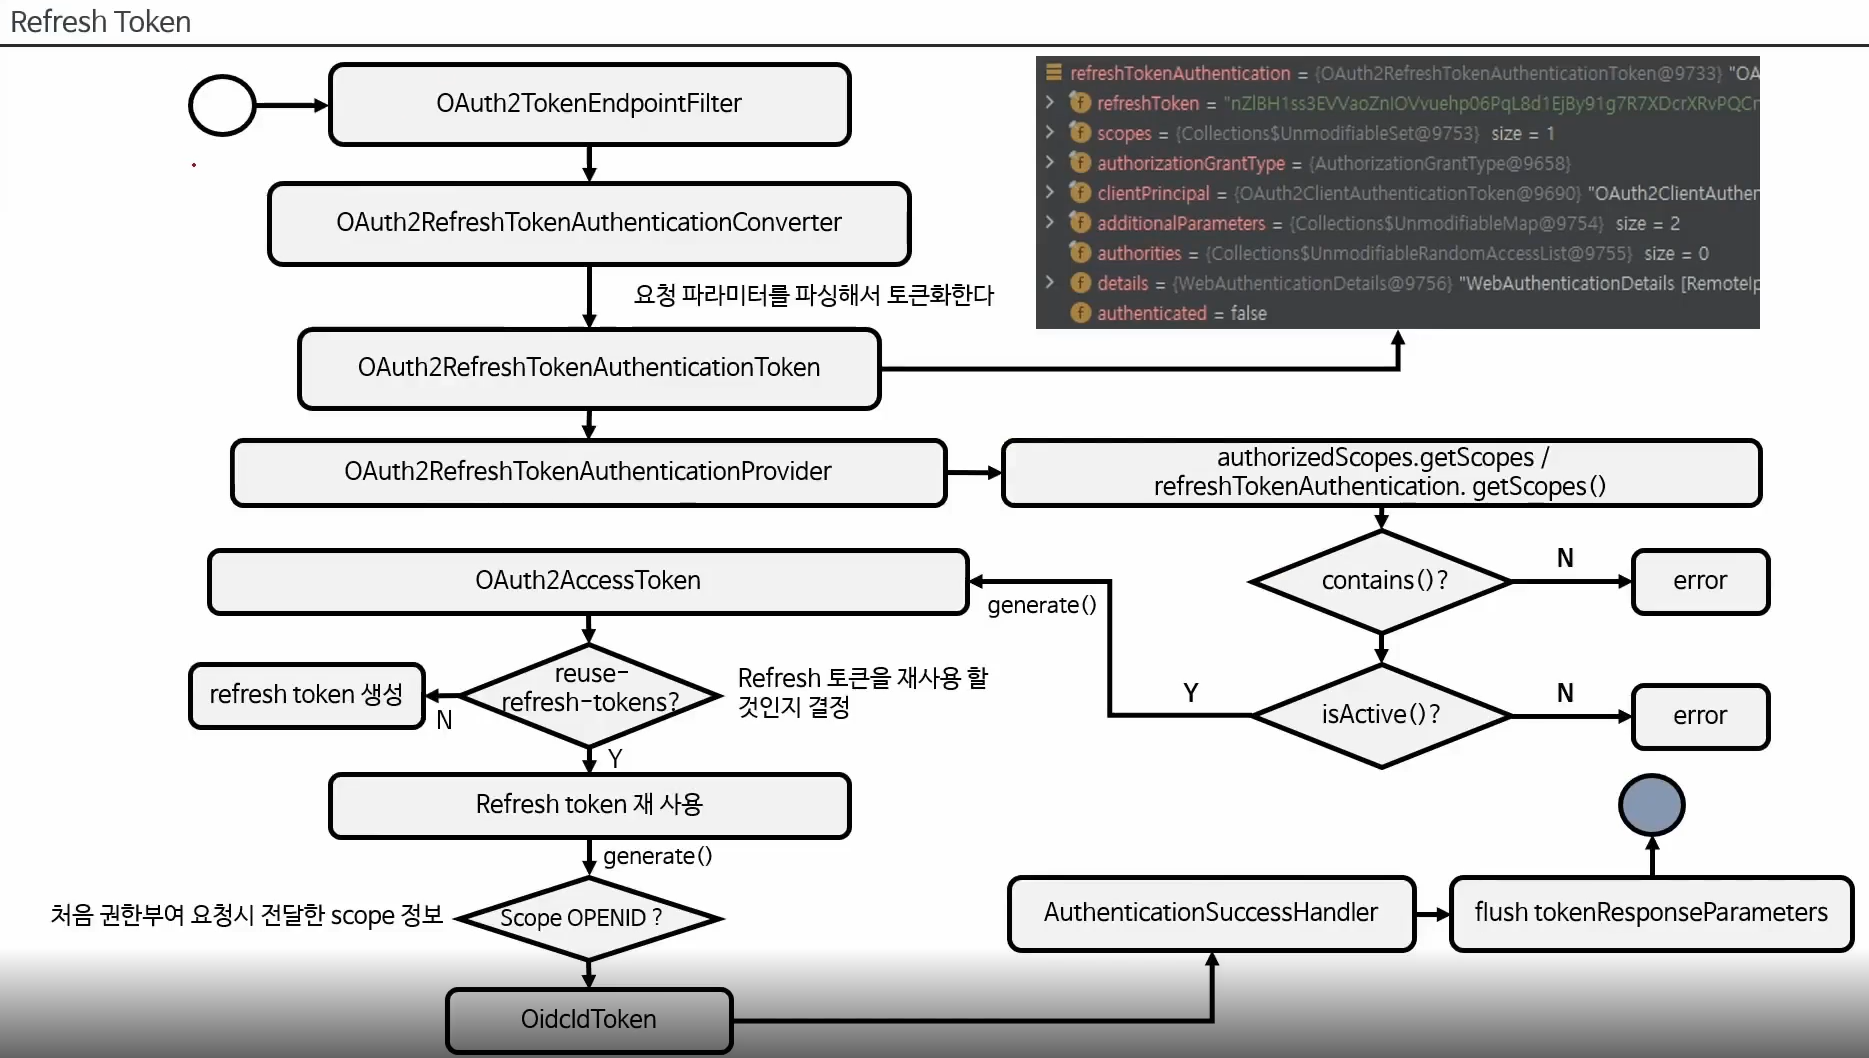
auth server에 서 쓰는 scope인지 확인하고 refresh token 이 access token을 발급받을 수 있는 자격이 있는지 isActive를 통해 검증하게 된다.
access token을 처음 발급 받은 당시에 open id scope가 존재했다면 처음 상태와 동일한 oidc token을 발급해주게 된다.
private RegisteredClient getRegisteredClient(String clientId, String clientSecret, String scope1, String scope2) {
    return RegisteredClient.withId(UUID.randomUUID().toString())
            .clientId(clientId)
            .clientSecret(clientSecret)
            .clientName(clientId)
            .clientIdIssuedAt(Instant.now())
            .clientSecretExpiresAt(Instant.MAX)
            .clientAuthenticationMethod(ClientAuthenticationMethod.CLIENT_SECRET_BASIC)
            .clientAuthenticationMethod(ClientAuthenticationMethod.CLIENT_SECRET_POST)
            .authorizationGrantType(AuthorizationGrantType.AUTHORIZATION_CODE)
            .authorizationGrantType(AuthorizationGrantType.CLIENT_CREDENTIALS)
            .authorizationGrantType(AuthorizationGrantType.REFRESH_TOKEN)
            .redirectUri("http://127.0.0.1:8081")
            .scope(OidcScopes.OPENID)
            .scope(OidcScopes.PROFILE)
            .scope(OidcScopes.EMAIL)
            .scope(scope1)
            .scope(scope2)
            .clientSettings(ClientSettings.builder().requireAuthorizationConsent(true).build())
            .tokenSettings(TokenSettings.builder().reuseRefreshTokens(false).build())
            .build();
}
client를 등록할시에 tokenSetting으로 refresh token을 그대로 쓸지 아니면 새로 발급받을지 결정하게 된다. 기본값은 true이다. 즉 동일한 refreshtoken을 주게된다.
OAuth2.0 Token Endpoint Flow - Authorization Code with PKCE 엔드포인트
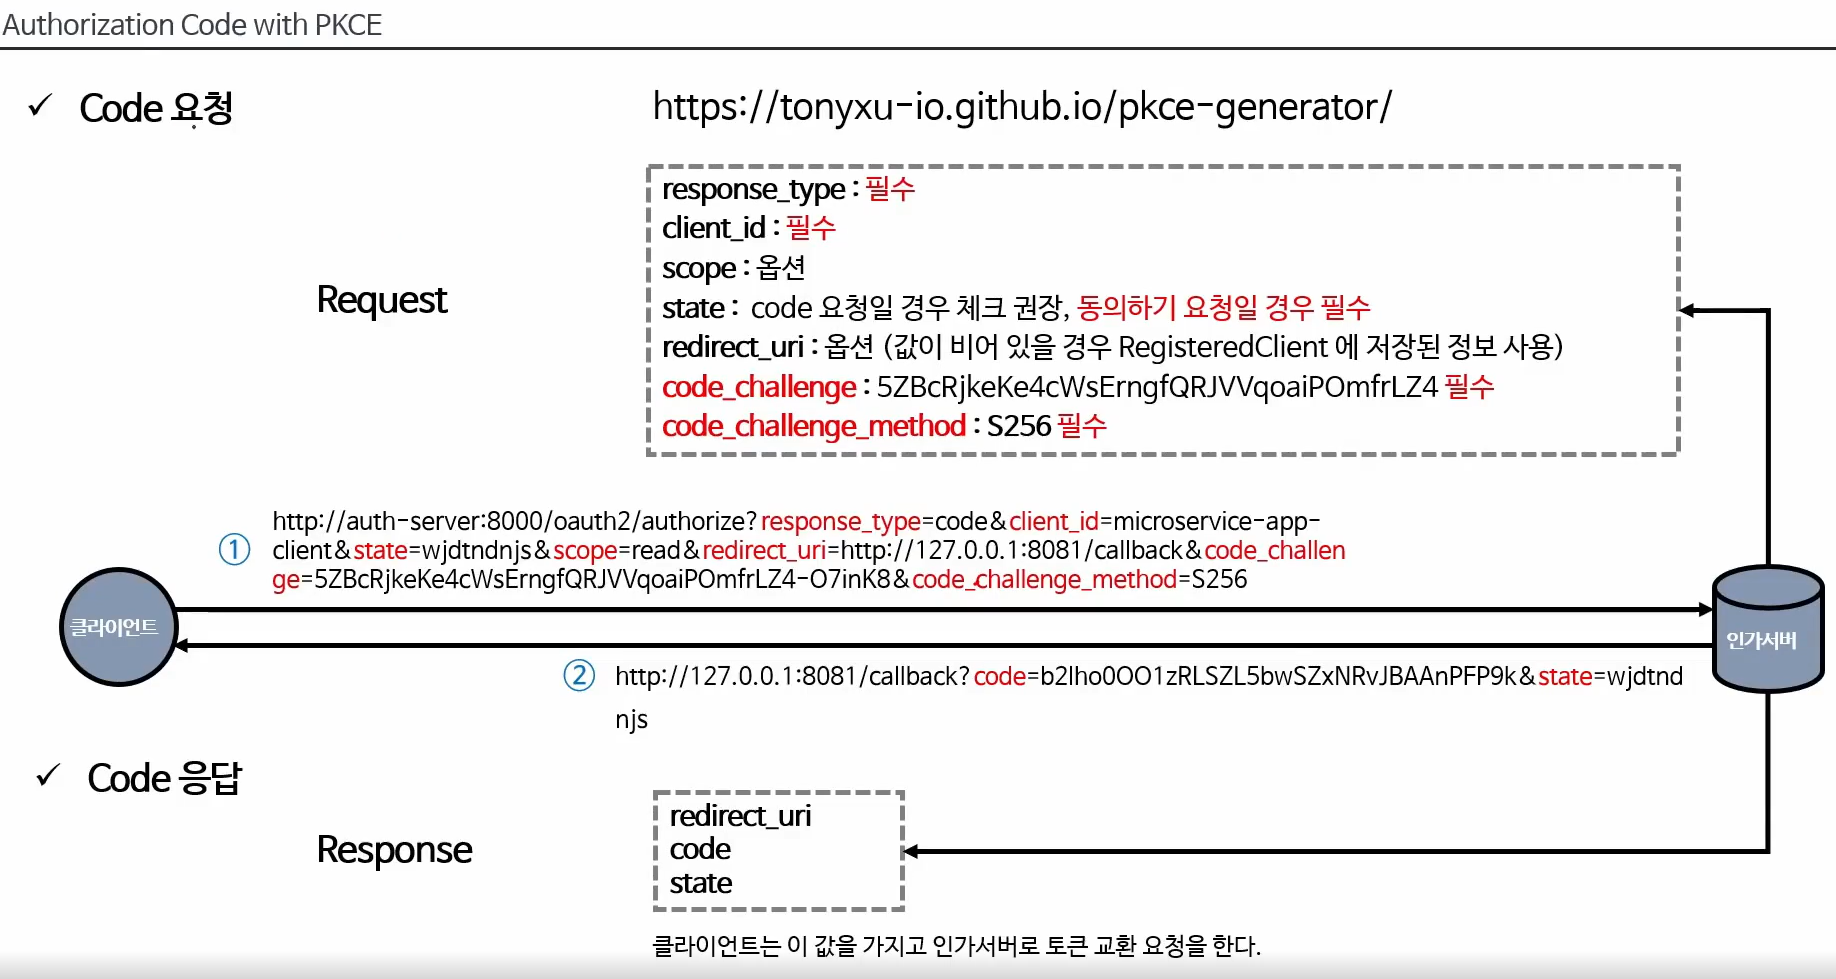
code_challenge = data를 해시한 값
code_challenge_method = 위 data를 해싱한 해싱알고리즘
나머지는 authorization code와 동일하다.
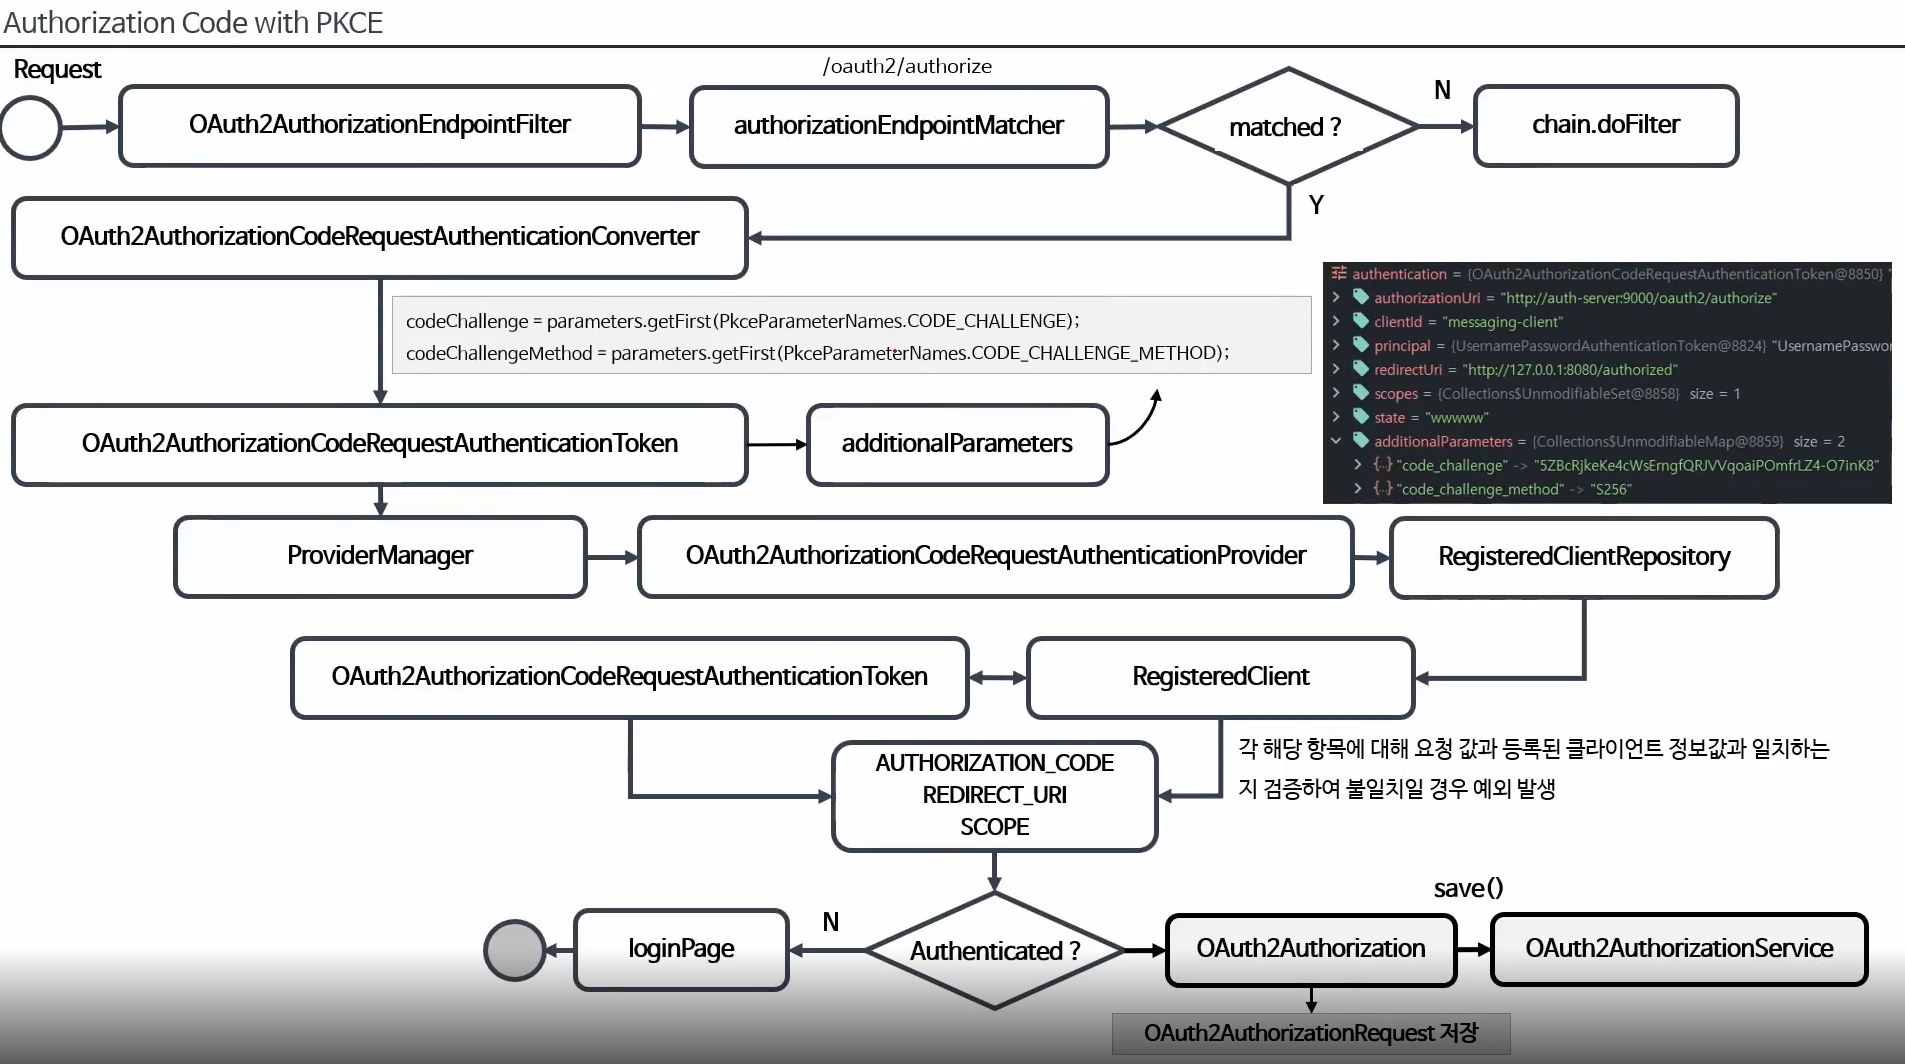
OAuth2AuthorizationRequest를 저장하게 되는데 나중에 client가 원본 data로 요청시에 기존에 왔던 codeChallenge로 검증하기 위해서이다.
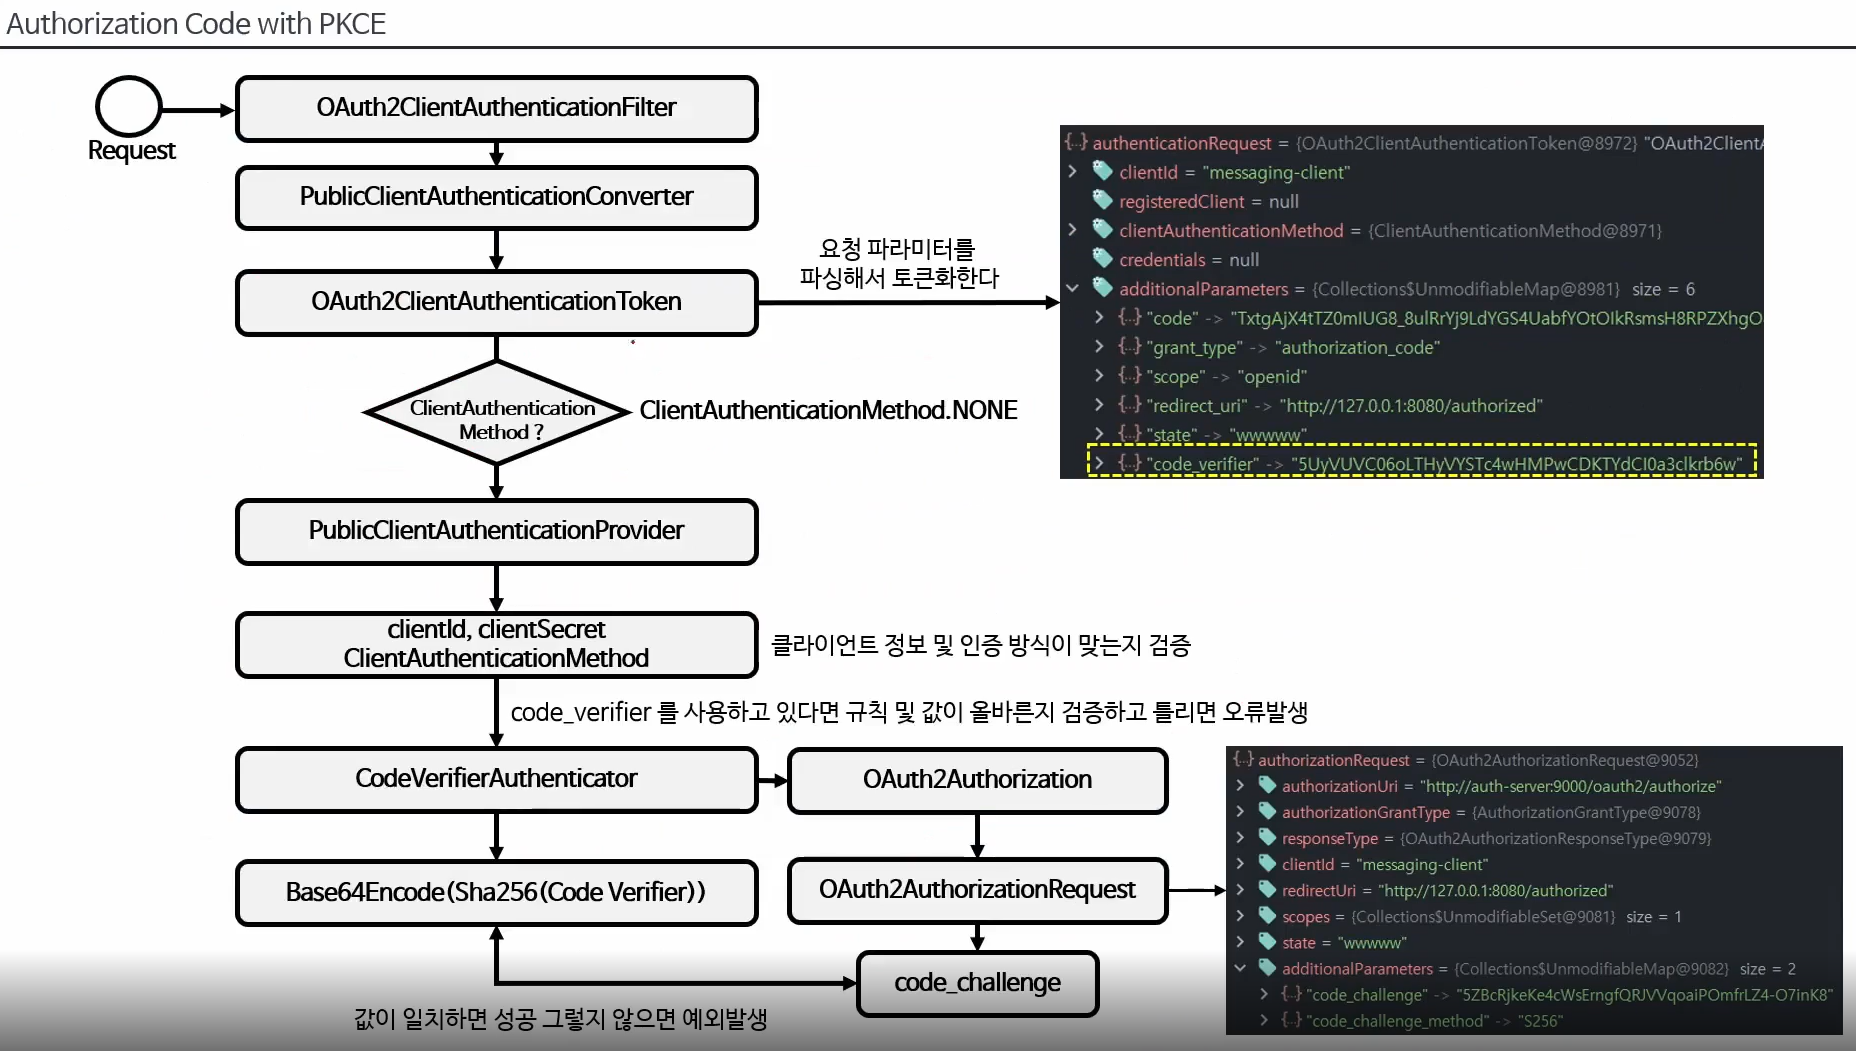
access token 을 요청하는 단계이다. 먼저 client가 secret ,id로 인증을 받고 같이 넘어온 code_verifier를 해시 해봐서 첫번 째 요청에서 받았던 code_challenge 랑 같은지 확인을 하게 된다.
이때 client id 만 줄경우 PKCE를 같이 해줘야 한다. PKCE없으면 client id , secret을 둘다 줘야하고 이게 2단 검증이니 보안이 좀 더 강력해진다.
OAuth2 2.0 Token Introspection Endpoint - 토큰 검사 엔드포인트
OAuth2TokenIntrospectionEndpoint Configurer
OAuth2 토큰 검사 엔드포인트에 대한 사용자 정의 할 수 있는 기능을 제공한다.
OAuth2 검사 요청에 대하 ㄴ전처리, 기본처리 및 후처리 로직을 커스텀하게 구현 할 수 있도록 API를 지원한다.
OAuth2TokenIntropsectionEndpointFilter 를 구성하고 이를 OAuth2 인증서버 SecurityFilterChain 빈에 등록한다.
OAuth2TokenIntrospectionEndpointFilter
IntrospectionRequestConverter = OAuth2 검사 요청을 추출하려고 할 때 사용되는 전처리기로서 OAuth2TokenIntrospectionAuthenticationToken을 반환한다.
OAuth2TokenIntrospectionAuthenticationProvider = OAuth2TokenIntrospectionAuthenticationToken 를 받아 인증처리를 하는 AuthenticatinoProvider 구현체
RequestMatcher = /oauth2/introspect POST
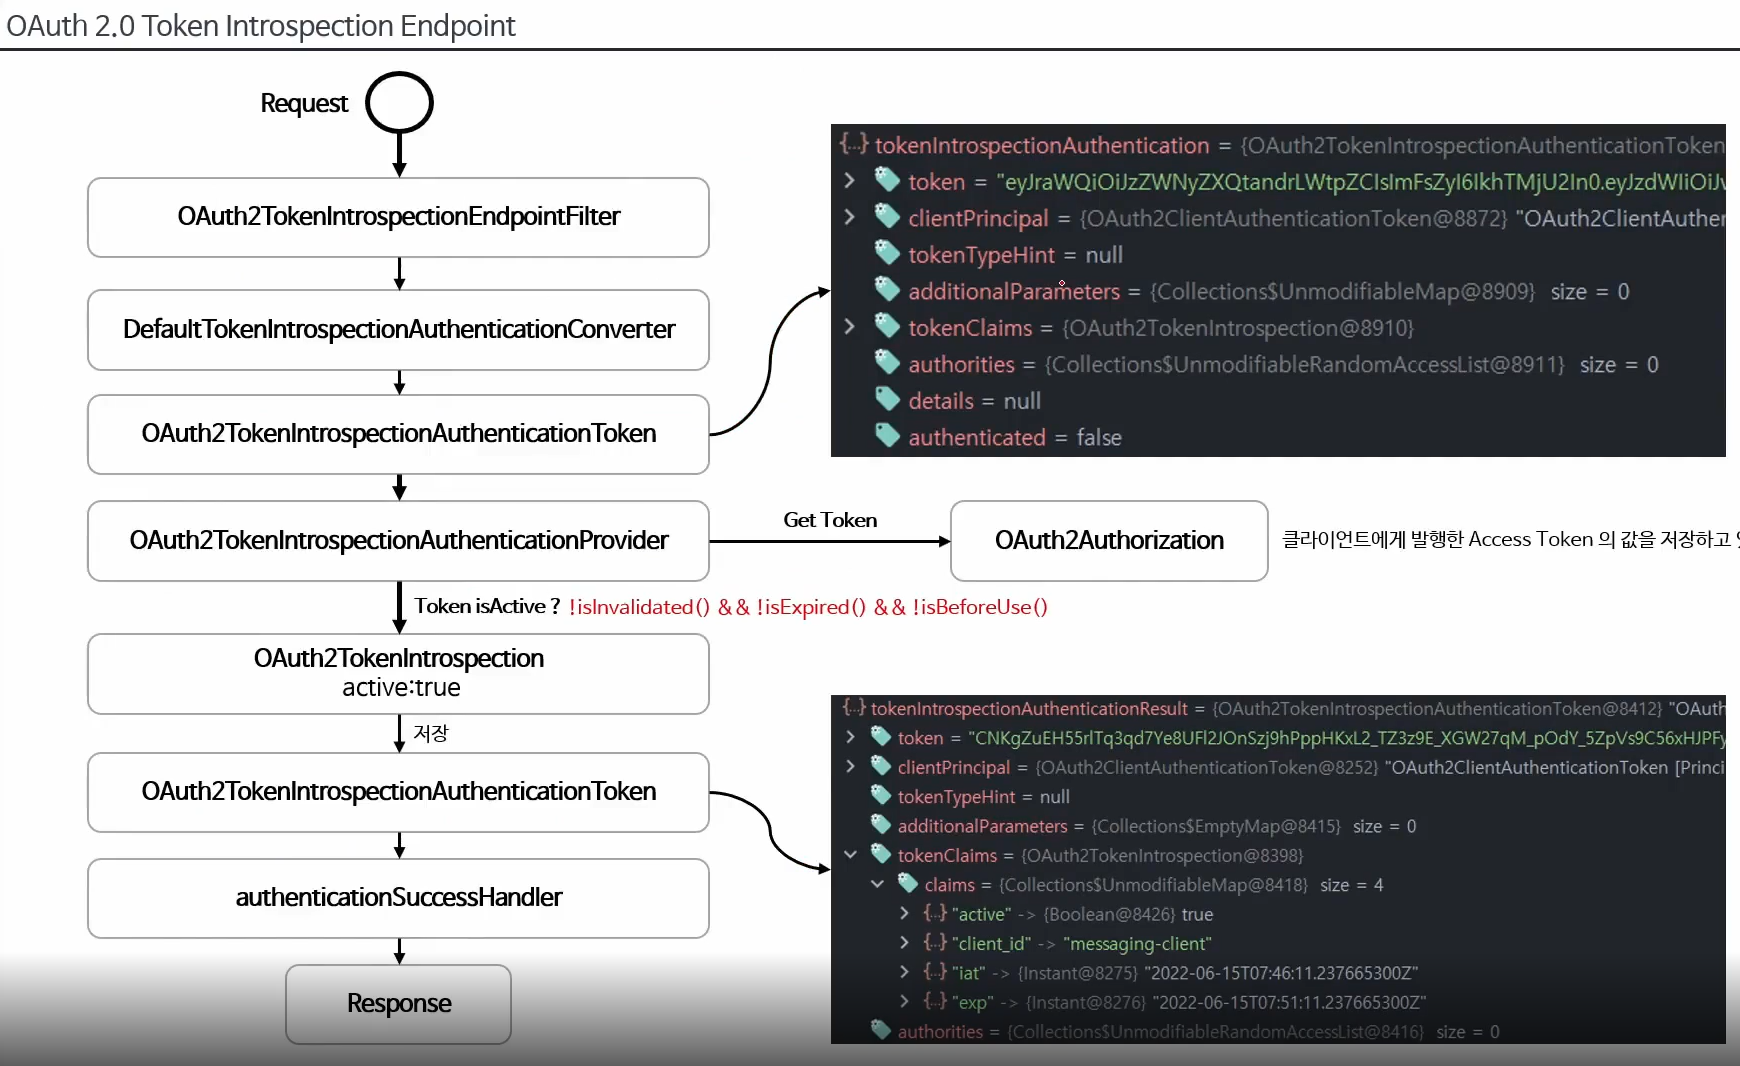
여기서 request를 보내는 주체는 client가 아니라 resource server이다.
OAuth2TokenIntropsectionAuthenticationToken 을 살펴보면 clientPrincipal 이존재한다. 원래 모든 access token요청은 client 인증을 받아야 한다.
현재 스샷은 인증 받은 OAuth2ClientAuthenticationToken이 들어가 있는 상태이다.
OAuth2Authorization(Auth server 의client session) 으로부터 GetToken요청을 하고 있다. client에게 이미 발행한 토큰을 가지고 있기 때문에 resource server가 준 access token 이랑 비교할 수 있다.
isBeforeUse 는 예를들면 , token을 10시 이후에 사용해야 한다 라는 종류의 규약이다.
실제 client에게 가는 token 의 claims 에 active =true, or false 를 전달 해주게 된다.
OAuth 2.0 Token Revociation Endpoint - 토큰 해지 엔드포인트
OAuth2TokenRevocationEndpointConfigurer
OAuth2 토큰 취소 엔드포인트에 대한 사용자 정의 할 수 있는 기능을 제공한다.
OAuth2 토큰 취소에 대한 전처리, 기본 처리 및 후처리 로직을 커스텀하게 구현할 수 있도록 API를 지원한다.
OAuth2TokenRevocationEndpointFilter를 구성하고 이를 OAuth2 인증서버 SecurityFilterChain 빈에 등록한다.
OAuth2TokenRevocationEndpointFilter
DefaultTokenRevocationAuthenticationConverter = OAuth2 토큰 취소를 추출하려고 할 때 사용되는 전처리기로서 OAuth2TokenRevocationAuthenticationToken을 반환한다.
OAuth2TokenRevocationAuthenticationProvider = OAuth2TokenRevocationAuthenticationToken 을 전달받아 인증처리를 하는 AuthenticationProvider 구현체이다.
RequestMatcher = /oauth2/revoke POST

client session 인 OAuth2Authorization이 가지고 있던 access token을 무효화 시키고 이것을 다시 OAuth2Authorization 에 저장을하게 된다.
나중에 다른 요청이 오면 해당 access token 의 metadata.token.invalidated는 true가 될 것이다.
해당 access token으로 요청을 보내면 isActive에서 검사하고 401 unauthroized를 보내게 될것이다.
OAuth 2.0 Authorization Server Metadata Endpoint / JWK Set Endpoint
OAuth2AuthorizationServerConfigurer
metadata endpoint , 이걸 처리할 filter 등을 설정해주게 한다.
RequestMatcher = /.well-known/oauth-authorization-server, GET = 인증 없이 요청해도 바로 받을 수 있다.
JWK Set endpoint 추가 및 NimusJwkSetEndpointFilter 구성 , 이 endpoint는 JWKSource<SecurityContext> 빈이 등록된 경우에만 구성된다.
RequestMatcer = /oauth2/jwks GET
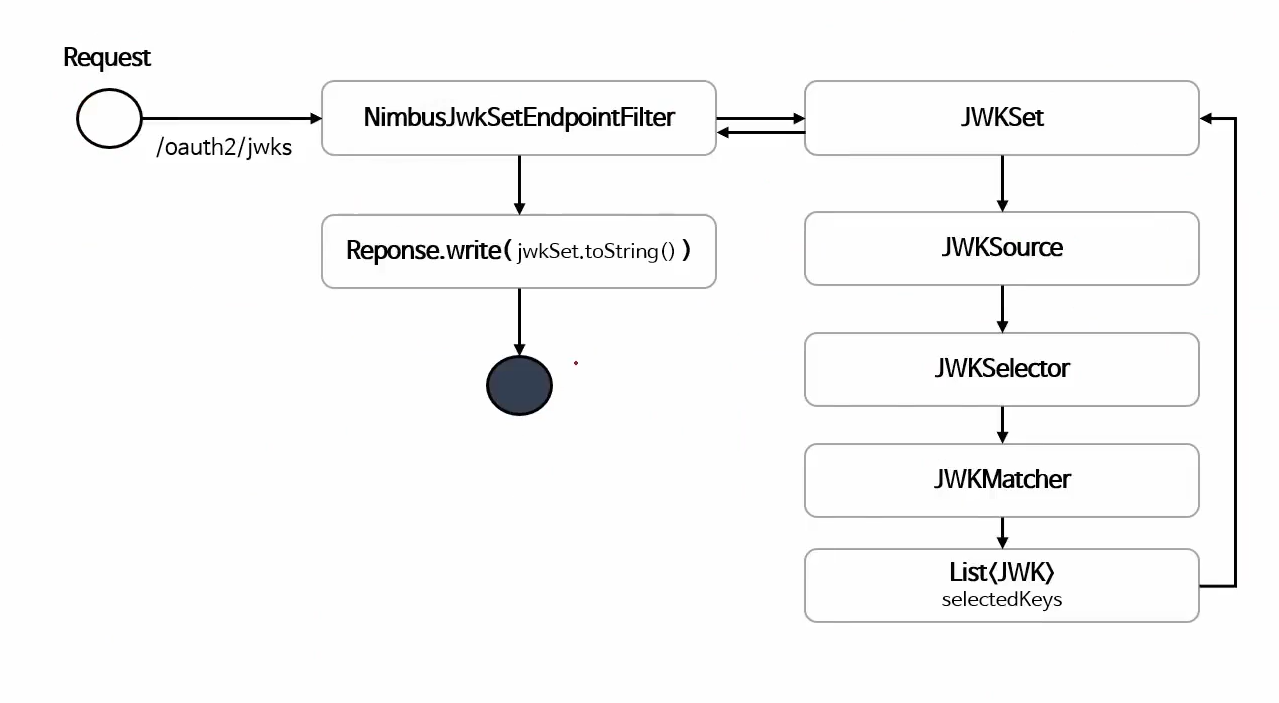
여러 JWK중 요청에 맞는 JWK만 Response에 반환을 하게 된다.
OpenID Connect 1.0 EndPoint - 사용자 정보 엔드포인트
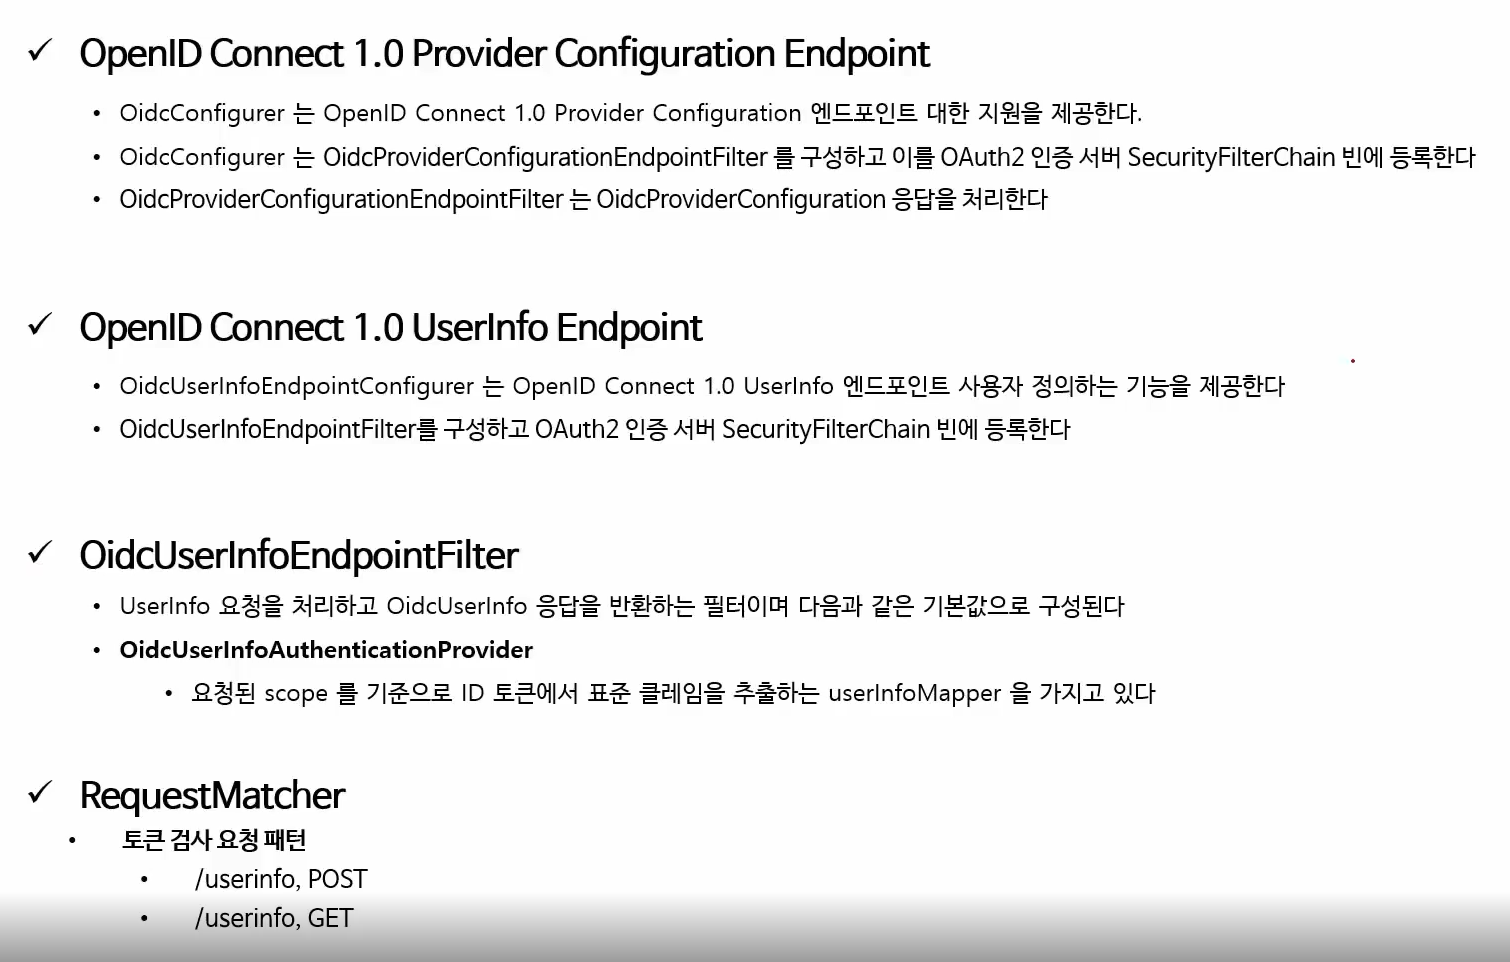

UserInfoEndpoint는 위에 다른 endpoint와 마찬가지로 client 인증을 받은 상태에서만 접근이 가능하다. FilterSecurityInterceptor 클래스 이후에 위치하고 있기 때문이다. filterchain 앞쪽에서 인증을 받은 상태여야 뒤 쪽에있는 EndpointFilter로 넘어갈 수 있는 것이다.
또한 access token 을 가지고 요청을 해야한다.

위 http jwt 구성을 통해서 토큰에 대한 인증과정을 거치도록 한다.
UserInfo 리소스는 FilterSecurityInterceptor 에서 권한이 허가된 이후 접근이 가능하도록 위치해 있다.
OpenID Connect 1.0 UserInfo 엔드포인트에는 토큰을 디코딩하고 검증하기 위한 JwtDecoder 빈이 필요하다.
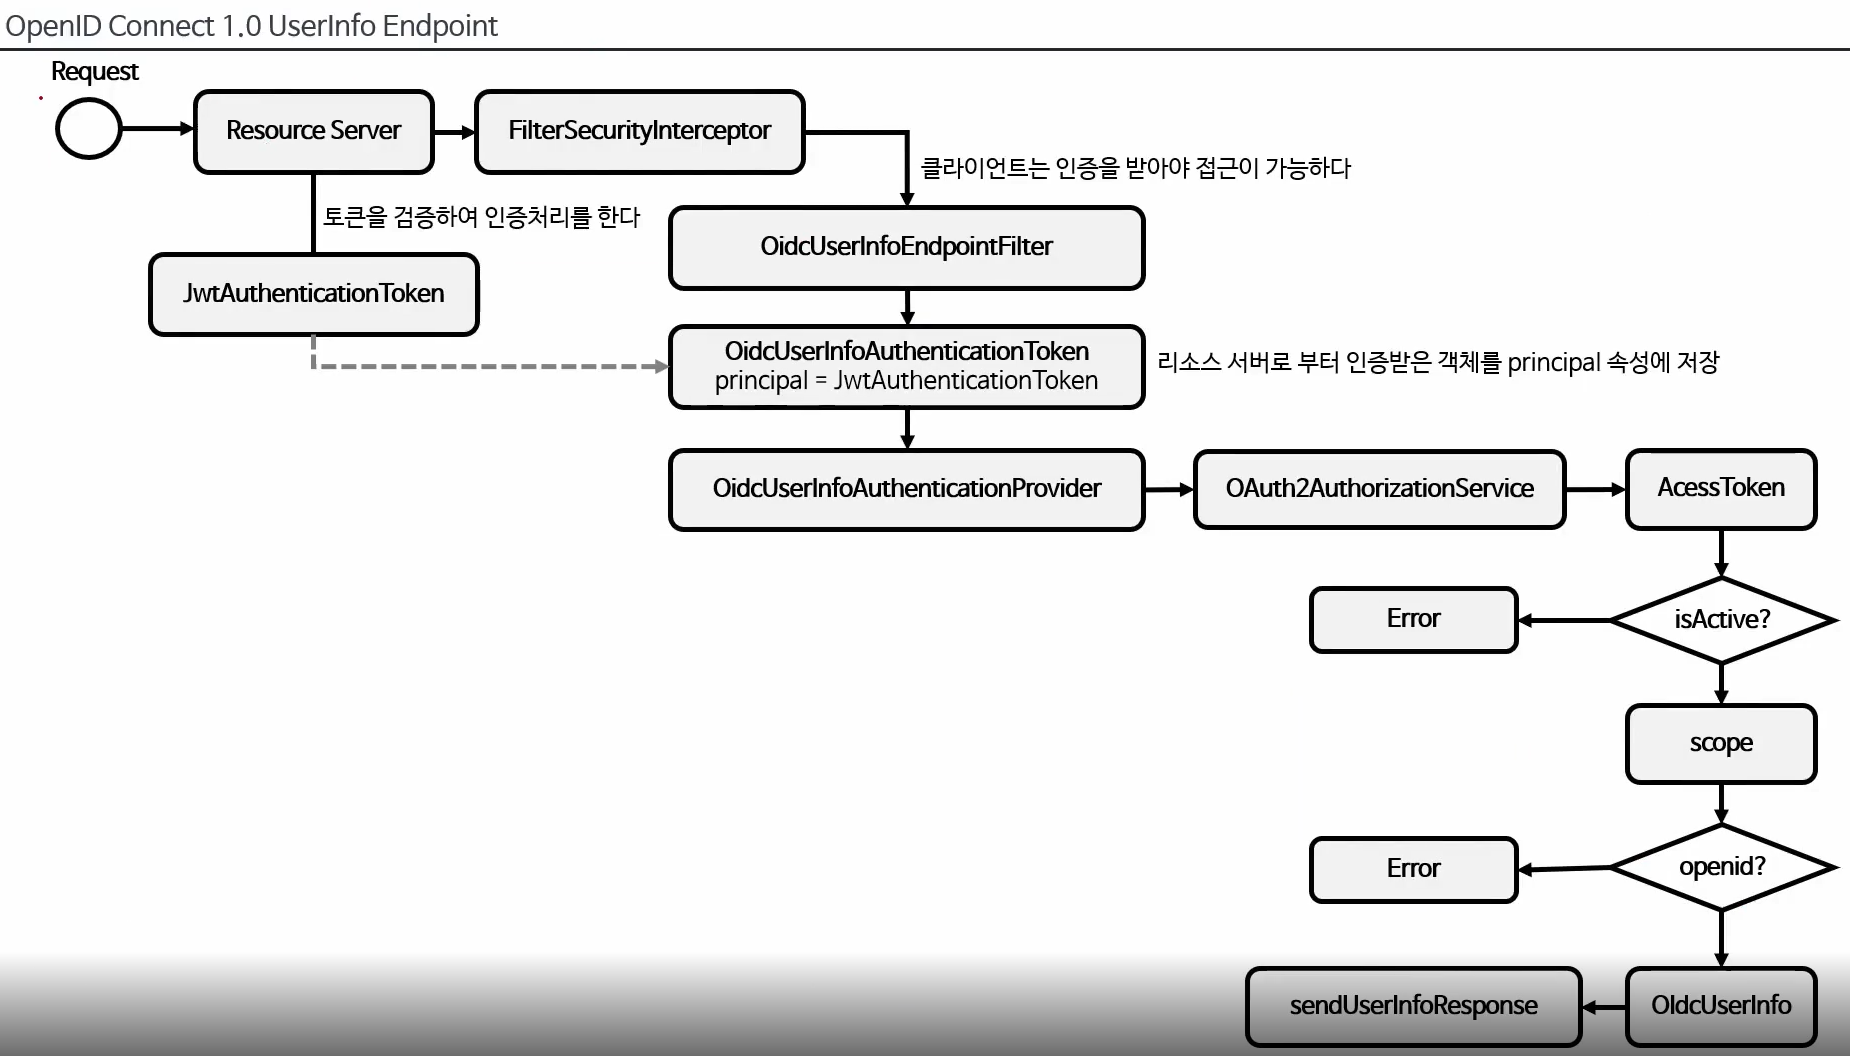
open id userinfo 요청을 보낼때 client는 access token과 함께 보내게 된다. 그러면 Resource server에서 정의한 방법대로 access token을 인증하게 되고 OidcUserInfoAuthenticationToken의 principal에 넣어주고 userinfo를 받으러 가게 된다.
spring security에서 제공하는 user info endpoint는 access token요청시 open id 를 요청하지 않았으면 접근이 불가능하다
'WEB > Security' 카테고리의 다른 글
| 스프링 시큐리티 기본 API 및 Filter 이해 (안겹치는것만) (0) | 2023.01.08 |
|---|---|
| OAuth 2.0 Client + Resource Server + Authorization Server 연동 (0) | 2022.12.28 |
| Spring Authorization Server + 주요 도메인 클래스 (3) | 2022.12.25 |
| OAuth 2.0 Resource Server - 리소스 서버 권한 구현 + opaque() (0) | 2022.12.25 |
| OAuth 2.0 Resource Server - MAC & RSA 토큰 검증 (0) | 2022.12.23 |