Scope 기반 권한 매핑 구현하기
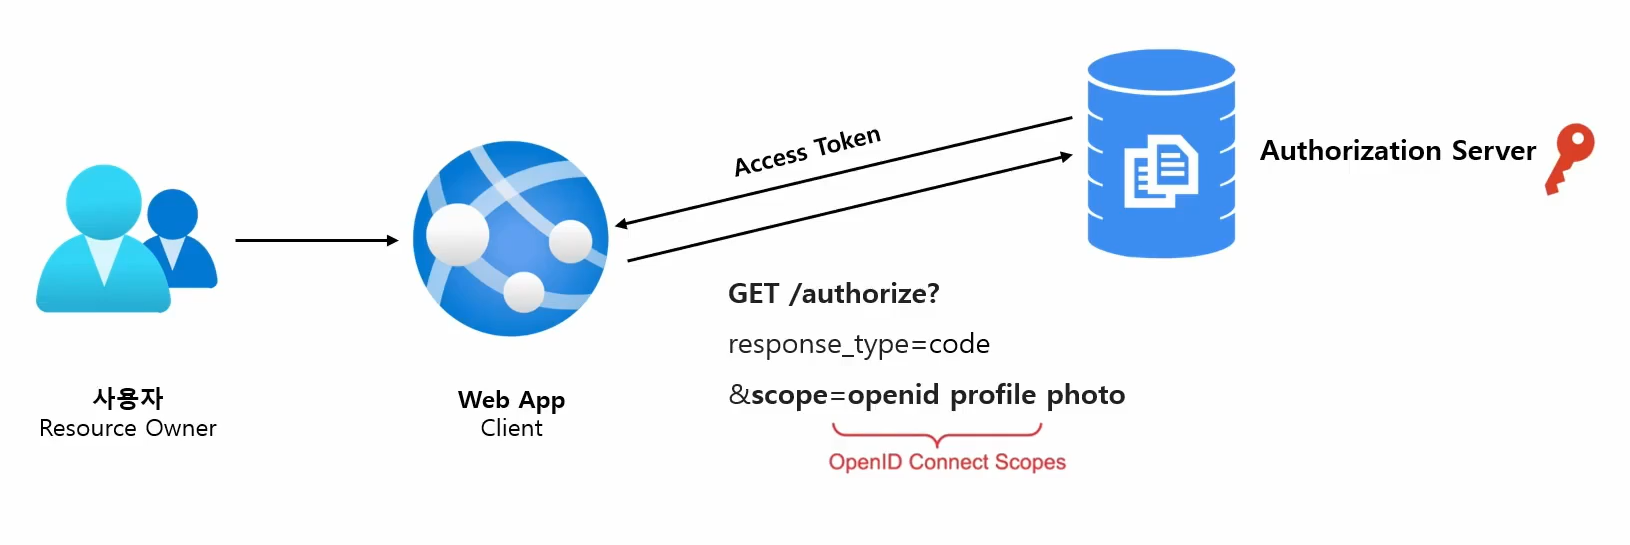
client 가auth server로 Oauth2.0 권한 부여 요청을 할 때
사용자의 리소스에 대한 접근 범위를 제한하기 위해 마련해 놓은 장치
client는 하나이상의 scope를 요청할 수 있으며 동의 화면에서 사용자가 scope를 지정하게 되면
scope 범위에 제한된 토큰이 발행된다.
auth server에 해당 scope에 적힌것들이 다 존재해야한다.
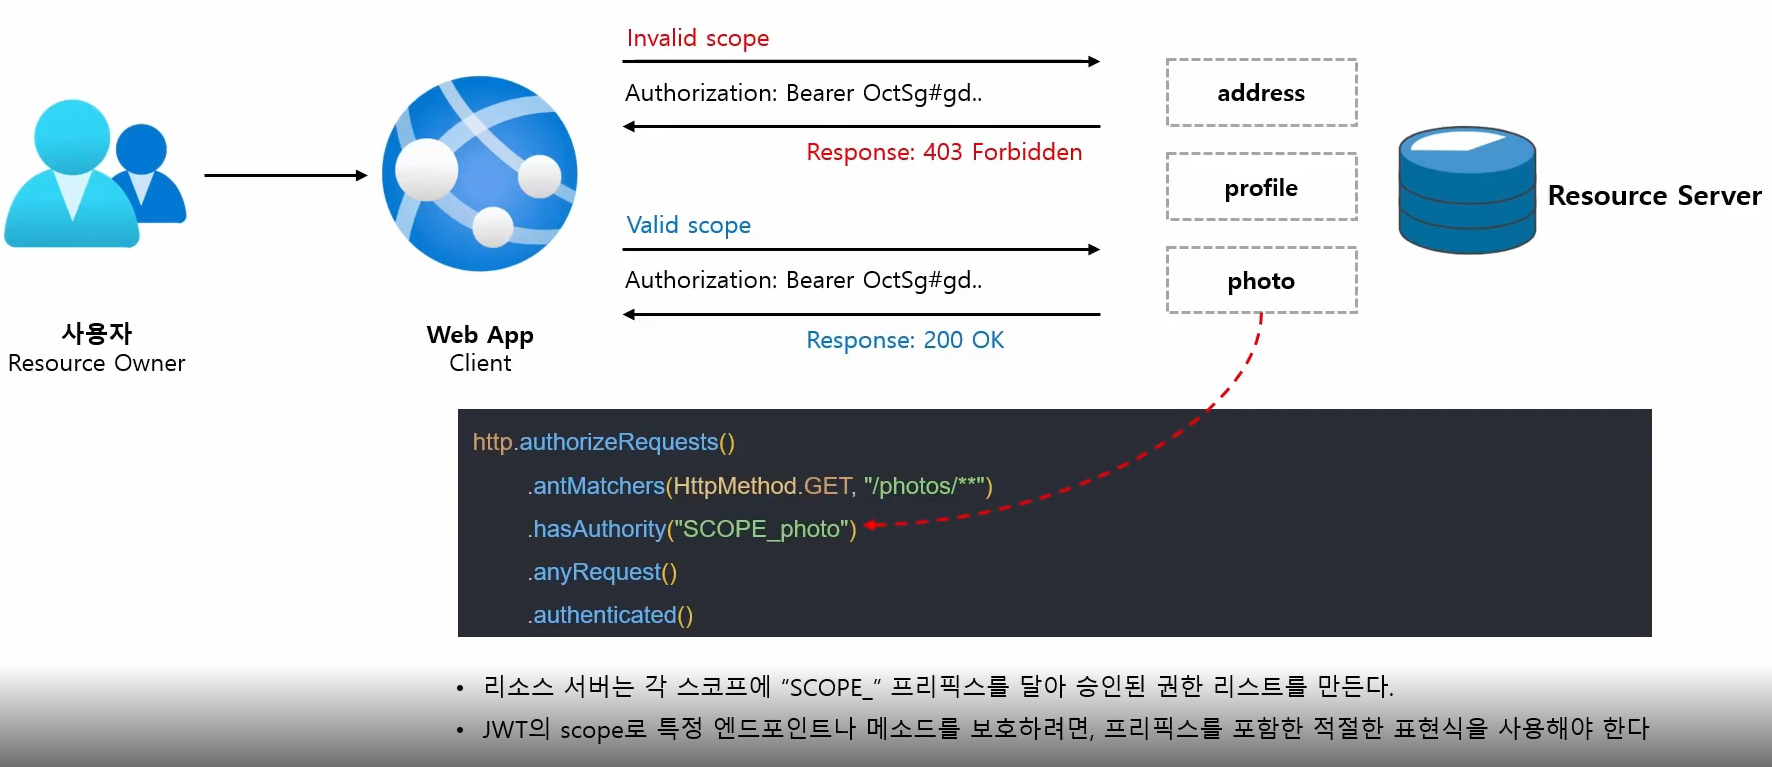
권한 부여 요청시 인가서버에 지정했던 scope가 리소스 서버의 권한 범위에 포함하지 않으면 접근이 거부된다.
권한 부여 요청시 인가서버에 지정했던 scope가 리소스 서버의 권한범위에 포함되면 접근이 허용된다.
예를들면) GET /photos/ 로 요청을 날릴시 token에 photo scope가 있어야만 허용된다.
@Configuration
@EnableGlobalMethodSecurity(prePostEnabled = true)
public class OAuth2ResourceServer {

    @Bean
    SecurityFilterChain securityFilterChain1(HttpSecurity http) throws Exception {
        http.antMatcher("/photos/1").authorizeRequests(
                (requests) -> requests.antMatchers(HttpMethod.GET, "/photos/1")
                .hasAuthority("SCOPE_photo")
                .anyRequest().authenticated());
        http.oauth2ResourceServer(OAuth2ResourceServerConfigurer::jwt);
        return http.build();
    }

    @Bean
    SecurityFilterChain securityFilterChain2(HttpSecurity http) throws Exception {
        http.antMatcher("/photos/2").authorizeRequests(
                (requests) -> requests.antMatchers(HttpMethod.GET, "/photos/2").permitAll());
        http.oauth2ResourceServer(OAuth2ResourceServerConfigurer::jwt);
        return http.build();
    }
}
2개의 SecurityFilterChain을 만들었다.
/1의 경우에는 접근시 GrantedAuthorites에 SCOPE_photo가 존재해야하지만 /2의 경우에는 다 허용된다.
auth server로 부터 token요청시 photo scope를 추가해야 /1는 허용된다.
@GetMapping("/photos/2")
@PreAuthorize("hasAuthority('SCOPE_photo')")
public Photo photosMethod(){

    return Photo.builder()
            .photoId("2")
            .photoDescription("Photo 2 title")
            .userId("user2")
            .build();
}
@PreAuthorize로 Controller에서 해당 api를 사용하기위한 scope를 지정할 수 있다.
@EnableGlobalMethodSecurity(prePostEnabled = true) 를 FilterChain을 만드는 @Configuration 클래스에 같이 넣어줘야 한다.
Adding multiple Spring Security configurations based on pathMatcher
I am trying to setup multiple security configurations that will use different SecurityApiKeyFilter classes based on the pathMatchers, for now I only got 2. One which works for all URLs and one which
stackoverflow.com
여러개의 SecurityChain이 존재할시 FilterChainProxy에서 어떤것과 request url이 matching 되는지 확인하고 알맞은 SecurityChain을 사용하게 된다.
권한 구성 커스터마이징 - JwtAuthenticationConverter
auth server 가 scope 속성 대신 자체 커스텀 속성을 사용하거나 리소스 서버에서 속성을 내부 권한에 맞게 조정해야 하는 경우 사용한다.
JwtAuthenticationConverter는 Jwt 객체를 Authentication 으로 변환하는 클래스이며 권한을 변환하는 JwtGrantedAuthoritiesConverter를 가지고 있다.
public class CustomRoleConverter implements Converter<Jwt, Collection<GrantedAuthority>> {

    private final String PREFIX = "ROLE_";

    // 인가서버에 scope 속성이 아닌 realm_access 클레임 정보를 사용한다 가정한다.
    @Override
    public Collection<GrantedAuthority> convert(final Jwt jwt) {

        String scopes = jwt.getClaimAsString("scope");
        Map<String, Object> realmAccess = jwt.getClaimAsMap("realm_access");

        if(scopes == null || realmAccess == null){
            return Collections.EMPTY_LIST;
        }

        Collection<GrantedAuthority> authorities1 = Arrays.stream(scopes.split(" ")) // 권한 prefix를 SCOPE_ 가 아닌 ROLE_로 변경
                .map(roleName -> PREFIX + roleName)
                .map(SimpleGrantedAuthority::new)
                .collect(Collectors.toList());

        Collection<GrantedAuthority> authorities2 = ((List<String>) realmAccess.get("roles")).stream()
                .map(roleName -> PREFIX + roleName)
                .map(SimpleGrantedAuthority::new)
                .collect(Collectors.toList());

        authorities1.addAll(authorities2);

        return authorities1;
    }
}
@Bean
SecurityFilterChain securityFilterChain1(HttpSecurity http) throws Exception {
JwtAuthenticationConverter jwtAuthenticationConverter = new JwtAuthenticationConverter();
jwtAuthenticationConverter.setJwtGrantedAuthoritiesConverter(new CustomRoleConverter());
http.authorizeRequests(
(requests) -> requests.antMatchers("/photos/1").hasAuthority("ROLE_photo")
.antMatchers("/photos/3").hasAuthority("ROLE_default-roles-oauth2")
.anyRequest().authenticated());
http.oauth2ResourceServer().jwt().jwtAuthenticationConverter(jwtAuthenticationConverter);
return http.build();
}FilterChain을 구성할시에 위에서 만든 Converter를 추가해줘야 build시에 해당 Converter가 사용되어 auth server로 부터 받아온 jwt claims 를 알맞게 GrantedAuthorities에 mapping 시킬 수 있다.
Opaque 개념 및 프로세스 이해
Opaque 토큰은 auth server에서 호스트하는 OAuth2.0 Introspection 엔드포인트로 검증한다.
Bearer 토큰이 리소스서버에서 처리하는 자체검증이라면 Opaque 토큰은 auth server에서 처리하는 원격검증이다.
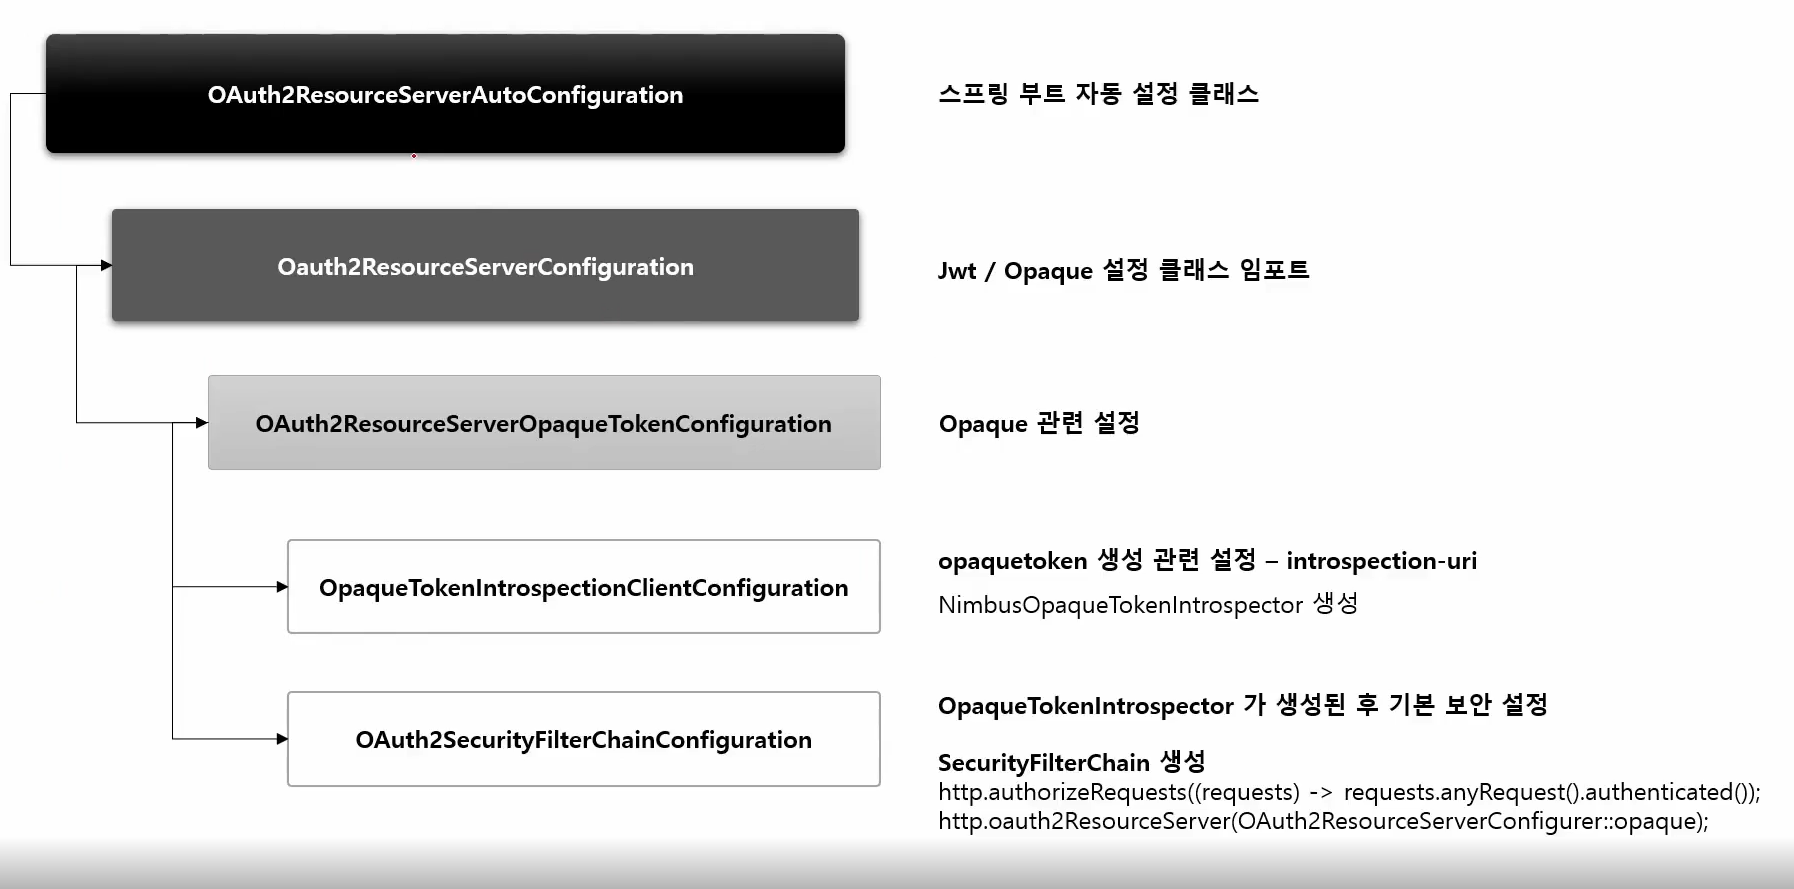
http.oauth2ResoucreServer(OAuth2ResourceServerCOnfigurer::opque) 로 spring security에서 알아서 application.yml에서 endpoint를 읽어오고 세팅을 다해준다.
runtimeOnly 'com.nimbusds:oauth2-oidc-sdk:9.35'spring:
security:
oauth2:
resourceserver:
opaquetoken:
introspection-uri: http://localhost:8080/realms/oauth2/protocol/openid-connect/token/introspect
client-id: oauth2-client-app
client-secret: dXf021lMWuZ9kZafqxZn230MvVEdROIoBearerTokenAuthenticationFilter에서 OpaqueTokenAuthenticationProvider가 authenticate를 intorpsectionurl을 통해서 시도한다.
@Configuration(proxyBeanMethods = false)
public class OAuth2ResourceServer {

    @Bean
    SecurityFilterChain securityFilterChain1(HttpSecurity http) throws Exception {

        http.authorizeRequests(
                (requests) -> requests.anyRequest().authenticated());
        http.oauth2ResourceServer(OAuth2ResourceServerConfigurer::opaqueToken);
        return http.build();
    }

    @Bean
    public OpaqueTokenIntrospector nimbusOpaqueTokenIntrospector(OAuth2ResourceServerProperties properties) {
        OAuth2ResourceServerProperties.Opaquetoken opaquetoken = properties.getOpaquetoken();
        return new NimbusOpaqueTokenIntrospector(opaquetoken.getIntrospectionUri(),opaquetoken.getClientId(),opaquetoken.getClientSecret());
    }
}
@Configuration(proxyBeanMethods = false)
class OAuth2ResourceServerOpaqueTokenConfiguration {
@Configuration(proxyBeanMethods = false)
@ConditionalOnMissingBean(OpaqueTokenIntrospector.class)
static class OpaqueTokenIntrospectionClientConfiguration {
@Bean
@ConditionalOnProperty(name = "spring.security.oauth2.resourceserver.opaquetoken.introspection-uri")
SpringOpaqueTokenIntrospector opaqueTokenIntrospector(OAuth2ResourceServerProperties properties) {
OAuth2ResourceServerProperties.Opaquetoken opaqueToken = properties.getOpaquetoken();
return new SpringOpaqueTokenIntrospector(opaqueToken.getIntrospectionUri(), opaqueToken.getClientId(),
opaqueToken.getClientSecret());
}
}기본으로 spring security에서 OpaqueTokenIntroSpector를 빈으로 제공하지만 현재는 gradle에서 주입한 dependency 우리가 직접 빈으로 만들고 있기떄문에
@ConditionalOnMissingBean에 걸려서 기본 으로 제공하지 않는 상태이다.
intropsect를 진행하고 나면 active , is not active한지 auth sever로 부터 결과를 받아오게 된다.
토큰 검사 및 프로세스 이해
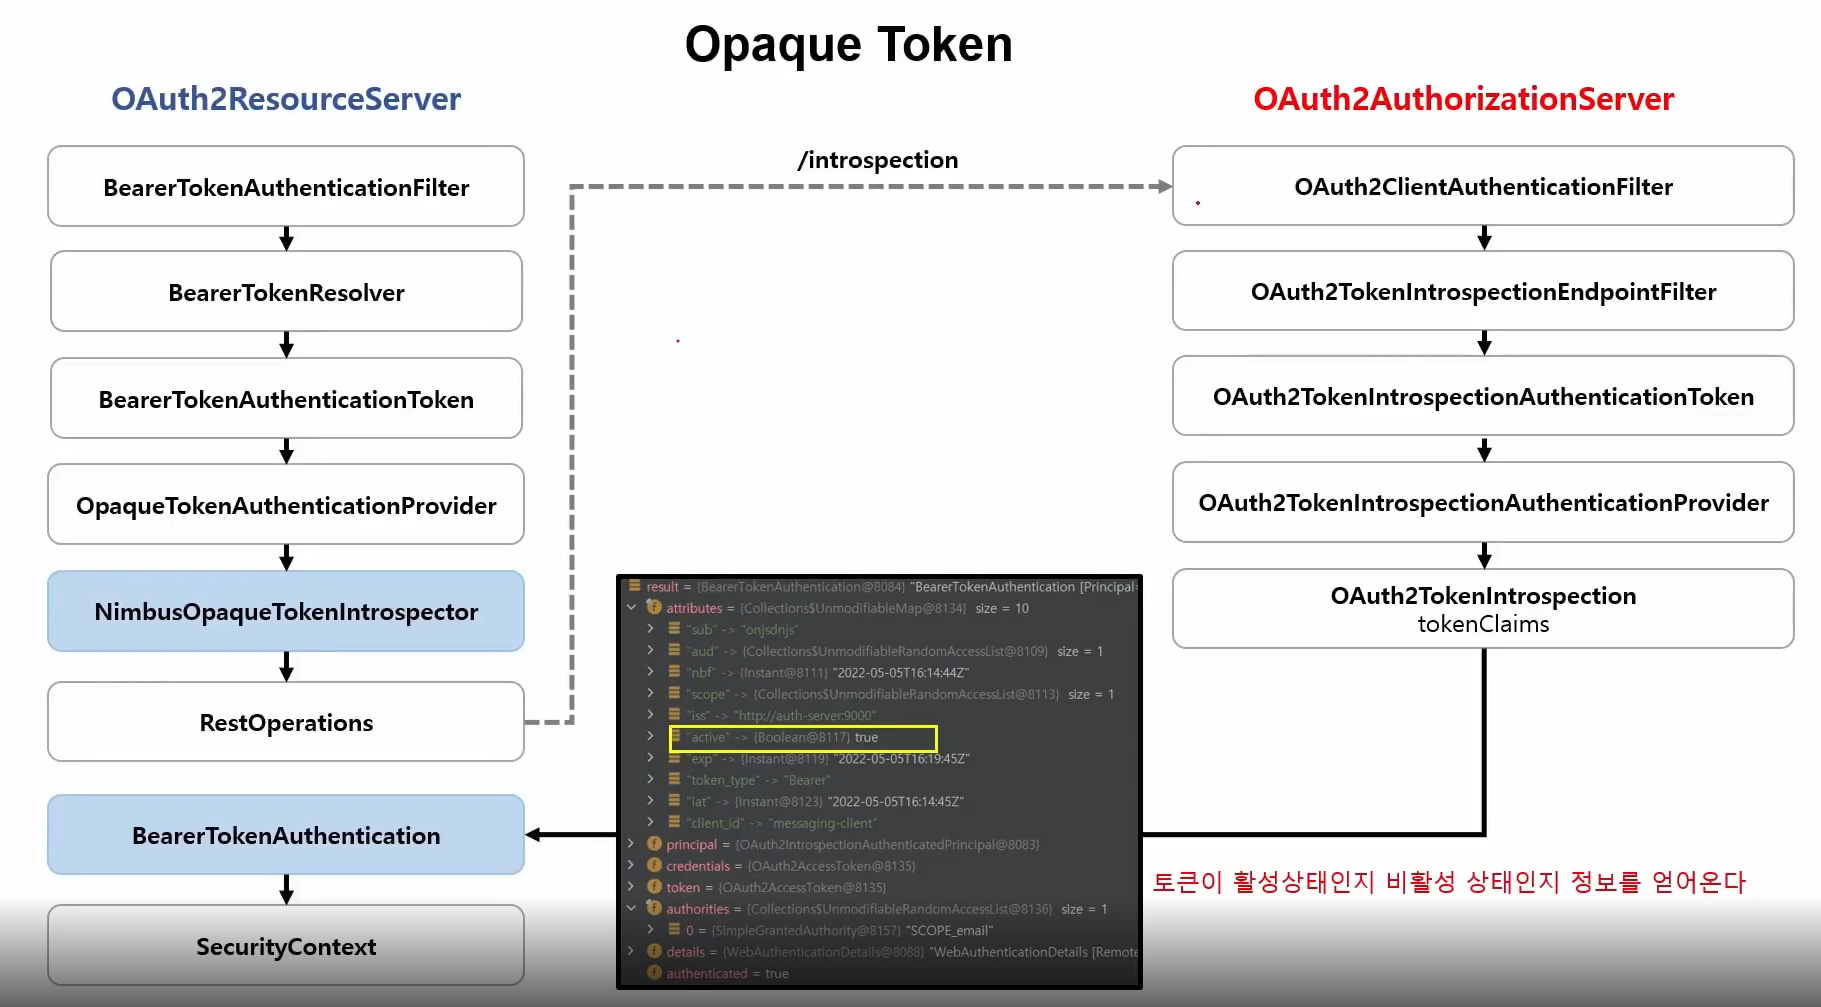
OpaqueTokenIntrospector 라는 interface를 구현한 NimbusOpqaqueTokenIntrospector에서 RestTemplate을 사용ㅎ여 auth server endpoint로 요청을 하게 된다.
public class CustomOpaqueTokenIntrospector implements OpaqueTokenIntrospector {

    private OpaqueTokenIntrospector delegate;

    public CustomOpaqueTokenIntrospector(OAuth2ResourceServerProperties properties) {
        delegate = new NimbusOpaqueTokenIntrospector(
                properties.getOpaquetoken().getIntrospectionUri(),
                properties.getOpaquetoken().getClientId(),
                properties.getOpaquetoken().getClientSecret());
    }

    @Override
    public OAuth2AuthenticatedPrincipal introspect(String token) {

        OAuth2AuthenticatedPrincipal principal = delegate.introspect(token);
        return new DefaultOAuth2AuthenticatedPrincipal(principal.getName(),
                principal.getAttributes(),
                extractAuthorities(principal));
    }

    private Collection<GrantedAuthority> extractAuthorities(OAuth2AuthenticatedPrincipal principal) {

        List<String> scopes = principal.getAttribute(OAuth2TokenIntrospectionClaimNames.SCOPE);
        return scopes.stream().map(scope -> "ROLE_" + scope.toUpperCase())
                .map(SimpleGrantedAuthority::new)
                .collect(Collectors.toList());
    }
}
@Bean
SecurityFilterChain securityFilterChain(HttpSecurity http) throws Exception {
http.authorizeRequests(
(requests) -> requests.anyRequest().authenticated());
// http.oauth2ResourceServer(OAuth2ResourceServerConfigurer::opaqueToken);
http.oauth2ResourceServer(oauth2 -> oauth2
.opaqueToken(opaqueToken -> opaqueToken
.introspector(opaqueTokenIntrospector(null))));
return http.build();
}
@Bean
public OpaqueTokenIntrospector opaqueTokenIntrospector(OAuth2ResourceServerProperties properties){
return new CustomOpaqueTokenIntrospector(properties);
}하지만 굳이 명시적으로 HttpSecurity에설정을 하지 않아도 custom한 Introspector 구현체가 있으면 Spring 기본 구현체를 사용하지 않는다.
주석처리 한곳을 해제하고 아래 3줄을 주석처리해도 동일하게 동작한다.
'WEB > Security' 카테고리의 다른 글
| Spring Authorization Server - 엔드포인트 프로토콜 (0) | 2022.12.26 |
|---|---|
| Spring Authorization Server + 주요 도메인 클래스 (3) | 2022.12.25 |
| OAuth 2.0 Resource Server - MAC & RSA 토큰 검증 (0) | 2022.12.23 |
| OAuth 2.0 Resource Server - 검증 기초 (0) | 2022.12.23 |
| OAuth 2.0 Resource Server API - jwt() (0) | 2022.12.22 |