테스트 코드를 이용한 테스트
public class HelloApiTest {
    @Test
    void helloApi() {
        TestRestTemplate rest = new TestRestTemplate();

        ResponseEntity<String> res =
                rest.getForEntity("http://localhost:8080/hello?name={name}", String.class, "Spring");

        assertThat(res.getStatusCode()).isEqualTo(HttpStatus.OK);
        assertThat(res.getHeaders().getFirst(HttpHeaders.CONTENT_TYPE)).startsWith(MediaType.TEXT_PLAIN_VALUE);
        assertThat(res.getBody()).isEqualTo("Hello Spring");
    }

    @Test
    void failsHelloApi() {
        TestRestTemplate rest = new TestRestTemplate();

        ResponseEntity<String> res =
                rest.getForEntity("http://localhost:8080/hello?name=", String.class);

        assertThat(res.getStatusCode()).isEqualTo(HttpStatus.INTERNAL_SERVER_ERROR);
    }
}
RestTemplate은 400, 500 응답이 넘어오면 예외를 던져버린다.
TestRestTemplate은 응답코드가 400,500 나와도 그대로 가져와서 사용할 수 있다.
빈 오브젝트의 역할과 구분

컨테이너 인프라스트럭처빈 = 컨테어너 자기 자신 뿐만아니라 여러 필요한 것들을 개발자가 명시하지 않아도 직접 빈을 등록을 하게 된다.
일반적으로 크게 관심을 가지지않지만 필요하다면 DI로 주입받아서 활용할 수 있다.
애플리케이션 인프라스트럭처 빈= @Configuration 클래스를 만들어서 구성정보를 적어서 빈으로 등록한다.
스프링은 여러 @Configuration중에 필요한 클래스를 주어진 설정에 맞게 빈으로 등록한다.
인프라 빈 구성 정보와 원리

다른 패키지에 2개의 클래스들을 담아서 더 이상 TomcatWebServerConfig , DispatcherServletConfig는 @ComponentScan의 대상이아니다.
@Configuration
public class DispatcherServletConfig {
    @Bean
    public DispatcherServlet dispatcherServlet() {
        return new DispatcherServlet();
    }
}
@Retention(RetentionPolicy.RUNTIME)
@Target(ElementType.TYPE)
@Import({DispatcherServletConfig.class, TomcatWebServerConfig.class})
public @interface EnableMyAutoConfiguration {
}@Import를 통해서 다른 패키지에 있는 @Configuration class(설정관련) 를 가졍로 수 있게되었다.
하지만 최상위 클래스에 줄줄이 import할 클래스들을 계속 붙이는 것은 좋지않다.
@Retention(RetentionPolicy.RUNTIME)
@Target(ElementType.TYPE)
@Configuration
@ComponentScan
@EnableMyAutoConfiguration
public @interface MySpringBootApplication {
}
meta annotation 은 recursive 하게 계속 적용이 된다.
EnableMyAutoConfiguration 가 meta annotation 역할을 하고 해당 annotation 내부에서 @Import를 통해 @Configuration을 불러온것이다.
동적인 자동 구성 정보 등록

기존에는 Dispatcher, Tomcat 을 둘다 가져왔는데 동적으로 선택해서 가져오게 하고 싶다.
ImportSelector#selectImports 는 우리가 import할 Configuration class들을 string으로 만들어서 넘기는 메소드이다. string에 적힌대로 컨테이너가 구성정보로 클래스를 사용한다.
DeferredImportSelector는 다른 @Configuration이 붙은 클래들의 작업이 끝난후에 마지막으로 동작하게 해주는 구현체이다. import할 클래스들의 순서를 뒤로 지연해준다.
DeferredImportSelector를 사용하여 Configuration 후보들을 다 읽어오게 된다.
@Retention(RetentionPolicy.RUNTIME)
@Target(ElementType.TYPE)
@Configuration(proxyBeanMethods = false)
public @interface MyAutoConfiguration {
}
proxyBeanMethods = false
프록시를 만드는방식을 꺼버리게 된다. 더 이상 @Configuration에서 @Bean으로 명시된 factory method들이 singleton을 return 하지 않기때문에 기존 처럼 동작하지 않게 된다.
@Retention(RetentionPolicy.RUNTIME)
@Target(ElementType.TYPE)
@Import(MyAutoConfigImportSelector.class)
public @interface EnableMyAutoConfiguration {
}
public class MyAutoConfigImportSelector implements DeferredImportSelector {
@Override
public String[] selectImports(AnnotationMetadata importingClassMetadata) {
return new String[]{"tobyspring.config.autoconfig.DispatcherServletConfig"};
}
}위 메소드에서 db, 외부설정 같은것을 참조하여 어떤 @Configuration을 가져올지 결정하면 된다.
현재는 그냥 가져오는중
자동 구성 정보 파일 분리
기존에 selectImports에서 필요한 Configuration 클래스들을 String을 return해줬다.
public class MyAutoConfigImportSelector implements DeferredImportSelector {
    private final ClassLoader classLoader;

    public MyAutoConfigImportSelector(ClassLoader classLoader) {
        this.classLoader = classLoader;
    }

    @Override
    public String[] selectImports(AnnotationMetadata importingClassMetadata) {
        List<String> autoConfigs = new ArrayList<>();

        ImportCandidates.load(MyAutoConfiguration.class, classLoader).forEach(autoConfigs::add);

        return autoConfigs.toArray(new String[0]);
    }
}
특정파일에 적혀있는 클래스이름들을 읽어오기 위해서 classloader를 사용하게 된다.

ImportCandidate.load 메소드 설명을 들어가면 빨간 동그라미에 적혀있는 파일에서
Fully qualified name으로 읽어오고싶은 설정 클래스 이름을 작성해주면 그것들을 읽어오게 된다.
@Configuration과 proxyBeanMethods
public class ConfigurationTest {
    @Test
    void configuration() {
        AnnotationConfigApplicationContext ac = new AnnotationConfigApplicationContext();
        ac.register(MyConfig.class);
        ac.refresh();

        Bean1 bean1 = ac.getBean(Bean1.class);
        Bean2 bean2 = ac.getBean(Bean2.class);

        Assertions.assertThat(bean1.common).isSameAs(bean2.common);
    }

    @Test
    void proxyCommonMethod() {
        MyConfigProxy myConfigProxy = new MyConfigProxy();

        Bean1 bean1 = myConfigProxy.bean1();
        Bean2 bean2 = myConfigProxy.bean2();

        Assertions.assertThat(bean1.common).isSameAs(bean2.common);
    }

    static class MyConfigProxy extends MyConfig {
        private Common common;

        @Override
        Common common() {
            if (this.common == null) this.common = super.common();

            return this.common;
        }
    }

    @Configuration
    static class MyConfig {
        @Bean
        Common common() {
            return new Common();
        }

        @Bean
        Bean1 bean1() {
            return new Bean1(common());
        }

        @Bean
        Bean2 bean2() {
            return new Bean2(common());
        }
    }


    static class Bean1 {
        private final Common common;

        Bean1(Common common) {
            this.common = common;
        }
    }

    static class Bean2 {
        private final Common common;

        Bean2(Common common) {
            this.common = common;
        }
    }

    static class Common {
    }

    // Bean1  <-- Common
    // Bean2  <-- Common
}
Bean1, 2 는 Common 을 의존한다.
proxyBeanMethod=true 가 default인데 이는 마치 MyConfigProxy를 사용해서 singleton을 유지하는것과 유사하다.
false로 하게되면 프록시로 감싸지않고 매번 새롭게 인스턴스를 생성을 하게된다.
스타터와 Jetty 서버 구성 추가
@MyAutoConfiguration
@Conditional(JettyWebServerConfig.JettyCondition.class)
public class JettyWebServerConfig {
    @Bean("jettyWebServerFactory")
    public ServletWebServerFactory servletWebServerFactory() {
        return new JettyServletWebServerFactory();
    }

    static class JettyCondition implements Condition {
        @Override
        public boolean matches(ConditionContext context, AnnotatedTypeMetadata metadata) {
            return false;
        }
    }
}
ServletWebServerFactory bean이 2개 존재하여서(tomcat, jetty) 문제가 된다.
Unable to start ServletWebServerApplicationContext due to multiple ServletWebServerFactory beans: tomcatWebServerFactory, jettyWebServerFactory
위 코드와 같이 @Conditional의 인자로 이 클래스를 빈으로 만들지 말지 결정하는 Condition 구현체를 넣어준다. 위 경우에는 무조건false라 tomcat이 실행 될 것 이다.
@Conditional 과 Condition
@Conditional 를 통해 Condition Inteface를 구현 클래스를 인자로 넣어준다. 그러면 spring이 어떤 bean을 써야할지 조건문을 작성해줄 수 있다.
public class ConditionalTest {
    @Test
    void conditional() {
        // true
        ApplicationContextRunner contextRunner = new ApplicationContextRunner();
        contextRunner.withUserConfiguration(Config1.class)
                .run(context -> {
                    assertThat(context).hasSingleBean(MyBean.class);
                    assertThat(context).hasSingleBean(Config1.class);
                });

        // false
        new ApplicationContextRunner().withUserConfiguration(Config2.class)
                .run(context -> {
                    assertThat(context).doesNotHaveBean(MyBean.class);
                    assertThat(context).doesNotHaveBean(Config1.class);
                });
    }

    @Retention(RetentionPolicy.RUNTIME)
    @Target(ElementType.TYPE)
    @Conditional(BooleanCondition.class)
    @interface BooleanConditional {
        boolean value();
    }

    @Configuration
    @BooleanConditional(true)
    static class Config1 {
        @Bean
        MyBean myBean() {
            return new MyBean();
        }
    }

    @Configuration
    @BooleanConditional(false)
    static class Config2 {
        @Bean
        MyBean myBean() {
            return new MyBean();
        }
    }

    static class MyBean {}

    static class BooleanCondition implements Condition {
        @Override
        public boolean matches(ConditionContext context, AnnotatedTypeMetadata metadata) {
            Map<String, Object> annotationAttributes = metadata.getAnnotationAttributes(BooleanConditional.class.getName());
            Boolean value = (Boolean)annotationAttributes.get("value");
            return value;
        }
    }
}
Application Context getbean 메소드 보다 assert에서 제공해주는 bean 관련 라이브러리르 통해 test code를 작성할 수 있다.
ApplicationContextRunner는 test용으로 쓰이는 context이다.
@Configuration 이 붙어있는 클래스자체도 bean으로 등록이 된다.
@BooleanConditional meta annotation을 하나 정의 해서 @Conditional을 추가한다.
BooleanCondition 클래스의 matches 메소드에서 annotation 인자로 주는 값을 받아와서 return 해주게된다.
커스톰 @Conditional
@MyAutoConfiguration
@ConditionalMyOnClass("org.eclipse.jetty.server.Server")
public class JettyWebServerConfig {
    @Bean("jettyWebServerFactory")
    public ServletWebServerFactory servletWebServerFactory() {
        return new JettyServletWebServerFactory();
    }
}
@Retention(RetentionPolicy.RUNTIME)
@Target({ElementType.TYPE, ElementType.METHOD})
@Conditional(MyOnClassCondition.class)
public @interface ConditionalMyOnClass {
String value();
}public class MyOnClassCondition implements Condition {
@Override
public boolean matches(ConditionContext context, AnnotatedTypeMetadata metadata) {
Map<String, Object> attrs = metadata.getAnnotationAttributes(ConditionalMyOnClass.class.getName());
String value = (String) attrs.get("value");
return ClassUtils.isPresent(value, context.getClassLoader());
}
}ClassUtils를 통해서 현재 특정 클래스가 존재하는지 확인해서 서로 충돌 없이 빈으로 등록될 수 있도록 한다.
현재 build.gradle에서 tomcat dependency를 제거 한 상태이다. jetty는 존재할테니 jetty로 부팅이 잘될것이다.
자동 구성 정보 대체하기
@Configuration(proxyBeanMethods = false)
public class WebServerConfiguration {
@Bean
ServletWebServerFactory customerWebServerFactory() {
TomcatServletWebServerFactory serverFactory = new TomcatServletWebServerFactory();
serverFactory.setPort(9090);
return serverFactory;
}
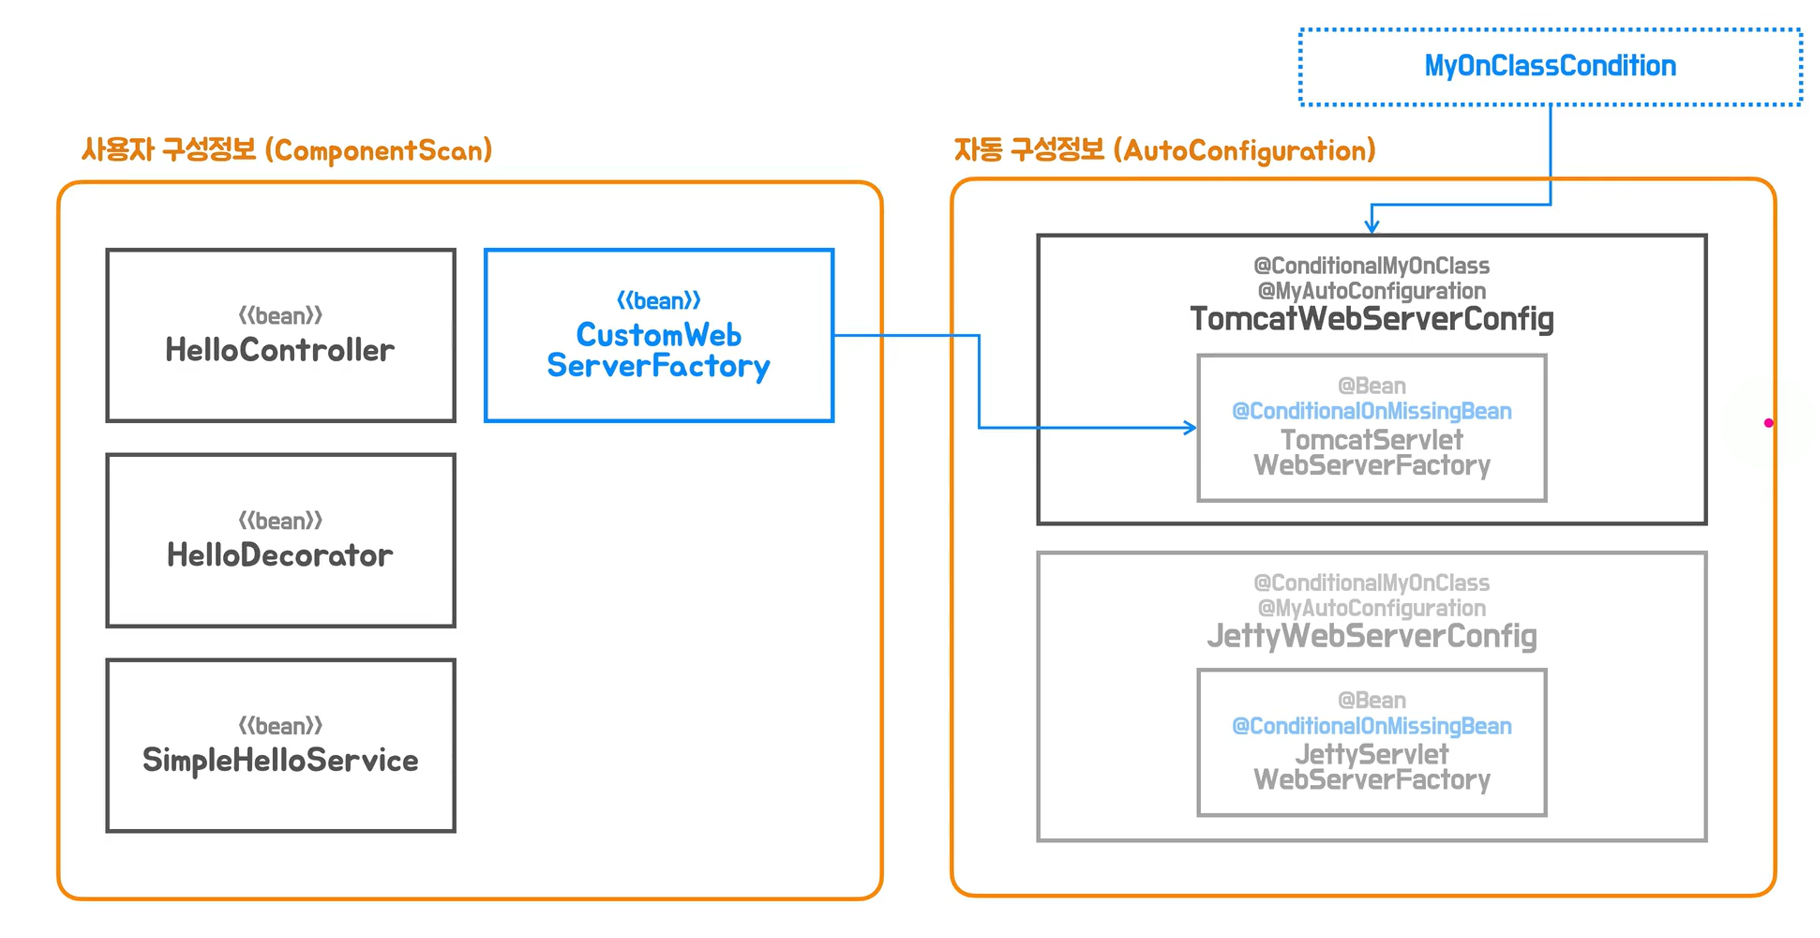
}기존 selector 에서 WebServerConfig 클래스를 빈으로 등록하여 제공하는 tomcat ServletWebServerFactory 말고 사용자가 custom하게 정의한것을 따로 등록하면
@ConditionalOnMissingBean에서 현재 사용자가 정의한것이 있으니까 따로 spring에서 등록하지 않는다.
DeferredImportSelector는 유저구성정보가 다 로딩이되고 자동구성정보를 로딩하게 된다.
자동구성정보를 등록하는 시점에서 @ConditionalOnMissingBean이 유저구성 정보랑 겹치는게 있는지 확인할 수 있다.
스프링 부트의 @Conditional
spring 4.0 부터 제공되는 annotation이다. @Profile도 meta annotation으로 @Conditional 을 갖고 있다.
Class Conditions
- @ConditionalOnClass
- @ConditionalOnMissingClass
지정한 클래스의 프로젝트내 존재를 확인해서 포함 여부를 결정한다.
주로 @Configuration 클래스 레벨에서 사용하지만 @Bean메소드에도 적용 가능하다. 단, 클래스 레벨의 검증없이 @Bean 메소드에만 적용하면 불필요하게 @Configuration 클래스가 빈으로 등록되기 때문에, 클래스 레벨 사용을 우선해야한다.
Bean Conditions
- @ConditionalOnBean
- @ConditionalOnMissingBean = 라이브러리를 만들때 사용하면 제데로 동작하지만 유저설정에서 적용하면 어차피 유저설정이 먼저 되기 때문에 제대로 적용이 되지 않는다.
빈의 존재 여부를 기준으로 포함여부를 결정한다. 빈의 타입또는 이름을 지정할 수 있다. 지정된 빈 정보가 없으면 메소드 레턴 타입을 기준으로 빈의 존재여부를 체크한다.
컨테이너에 등록된 빈 정보를 기준으로 체크하기 때문에 자동구성 사이에 적용하려면 @Configuration 클래스의 적용 순서가 중요하다. 개발자가 직접 정의한 커스톰 빈 구성 정보가 자동 구성 정보 처리보다 우선하기 때문에 이 관계에 적용하는 것은 안전하다. 반대로 커스톰 빈 구성 정보에 적용하는건 피해야 한다.
'WEB > Spring Boot' 카테고리의 다른 글
| 웹 서버와 서블릿 컨테이너 (0) | 2023.05.08 |
|---|---|
| 스프링 부트 자세히 살펴보기 (0) | 2023.02.14 |
| Spring JDBC 자동 구성 개발 (0) | 2023.02.14 |
| 외부 설정을 이용한 자동 구성 (0) | 2023.02.13 |
| 독립 실행형 서블릿 애플리케이션 (0) | 2023.02.02 |