Platform = 실제 테스트를 실행해주는 런처 제공 , TestEngine API 제공
Jupiter = JUnit5 를 제공하고 TestEngine API를 구현함
Vintage = JUni3,4 용 TestEngine API 구현체
Spring Boot에서 기본적으로 JUnit5를 디펜던시로 껴있다.
없으면 maven에서 따로 jupiter engine을 추가하면 된다.
@BeforeAll , @AfterAll 은 static void로 작성해야하고 전체 테스트 실행 전, 후 실행 되는 메서드이다.
@BeforeEach @AfterEach static void로 작성할 필요는 없지만 그냥 통일하는게 좋을듯, 모든 @Test 각각의 전후에 실행되는 메소드이다.
@Disabled 는 @Test중에 깨지는 경우 해당 Annotation으로 마킹해두면 넘어간다.
Junit5 Assertion
assertEquals(expected , actual , message)
이떄 message에 () -> "test failed" 처럼 람다로 제공해주는것이 좋다. 해당 메시지가 복잡한 경우 람다로 작성하면 실제 호출 되는 시점까지 최대한 지연시켜 메시지를 산출하기 때문이다.
assertAll 은 여러개의 Executuable 을 받아서 실행시켜준다. 이때 여러 asserts 들을 람다로 만들어 인자로 넣어주면 한꺼번에 실행시켜준다.
강의에서는 asserts 가 source의 변화로 인해 깨져있는 경우를 한번에 확인하기 위해 쓰임
static void assertTimeout(Duration timeout, Executable executable)assertTimeout 같은 경우는 executable이 다 실행될때까지 대기하게 된다.
private static <T> T assertTimeoutPreemptively(Duration timeout, ThrowingSupplier<T> supplier, Object messageOrSupplier) {
    ExecutorService executorService = Executors.newSingleThreadExecutor();

    Object var7;
    try {
        Future<T> future = executorService.submit(() -> {
            try {
                return supplier.get();
            } catch (Throwable var2) {
                throw ExceptionUtils.throwAsUncheckedException(var2);
            }
        });
        long timeoutInMillis = timeout.toMillis();

        try {
            var7 = future.get(timeoutInMillis, TimeUnit.MILLISECONDS);
assertTimeoutPreemptively 를 쓰면 timeout을 지나는 즉시 종료 되게 된다.
supplier는 전혀 다른 스레드에서 실행되기 때문에 ThreadLocal 이 supplier 로직에 존재하는 경우에는 의도한 대로 동작하지 않을 수있다.
예를 들어 트랜잭션 관련 로직이면 connection을 ThreadLocal에서 관리하게 되는데 기본 전략은 threadlocal은 공유가 안되기 때문에 테스트 진행시 롤백이 되지않고 db에 반영이 될 수 있다.
assumeTrue = @Test 자체를 실행을 어떤 환경 변수가 조건에 맞는 경우만 실행하고 싶을 때 사용한다.
조건이 맞지 않으면 아예 테스트를 실행하지 않음 (skip, fail과 다르다.)
참고로 terminal 에서 지정한(bashrc 같은) 환경 변수는 변경하면 intellij 를 껐다 켜야 적용이 된다. 켜질때 환경변수를 싸악 읽어옴으로
assumingThat (Predicate) 안의 조건에따라 실행될 (test할) 여러 로직을 작성할 수 있다. 조건에 맞는 것 만 실행하고 실행 된 것에 대해서만 pass, fail을 결정한다.
@DisabledOnOs( os ) = 운영체제 종류에 따라 test를 실행할지 말지 결정한다.
@EnabledOnJre( java -version)
@Tag("slow") , @Tag("fast") 로 메소드 별로 태깅을 해서 실행할 테스트들을 분리 할 수 있다.

intellij에서 원하는 태깅된 테스트만 실행하는 법이다.
<profiles>
    <profile>
        <id>default</id>
        <activation>
            <activeByDefault>true</activeByDefault>
        </activation>
        <build>
            <plugins>
                <plugin>
                    <artifactId>maven-surefire-plugin</artifactId>
                    <configuration>
                        <groups>fast</groups>
                    </configuration>
                </plugin>
            </plugins>
        </build>
    </profile>
    <profile>
        <id>ci</id>
        <build>
            <plugins>
                <plugin>
                    <artifactId>maven-surefire-plugin</artifactId>
                </plugin>
            </plugins>
        </build>
    </profile>
</profiles>
ci 서버에서는 fast, slow 모두다 실행하게 된다 , 별다른 설정을 해주지 않으면
<groups> fast | slow </groups> 로 명시적으로 설정할 수 있다. 이때는 default가 아니므로 ./mvn test -P ci 로 profile의 id를 명시해줘야한다.
@Target(ElementType.METHOD)
@Retention(RetentionPolicy.RUNTIME)
@Test
@Tag("fast")
public @interface FastTest {

}
위방식처럼 custom annotation을 만들어서 쓰는것이 좋다. @Tag("") 는 문자열을 넣어야하기 떄문에 오타가 발생할 수 있다.
테스트 반복하기

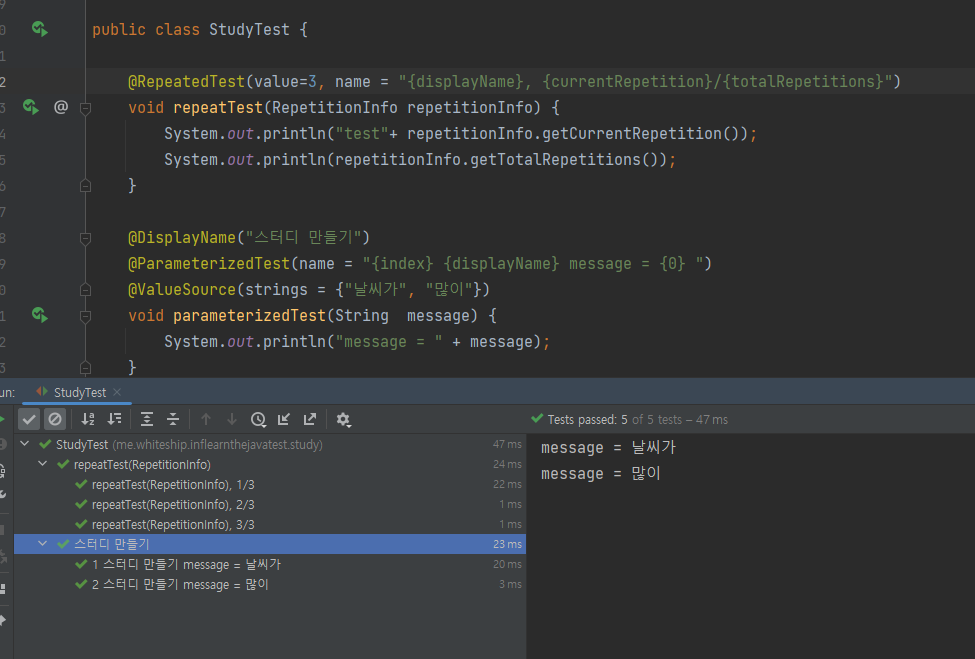
@RepeatedTest 로 반복적으로 실행이 가능하고 @ParameterizedTest를 통해 인자를 주입받을 수 있다.
@DisplayName("스터디 만들기")
@ParameterizedTest(name = "{index} {displayName} message = {0} ")
@ValueSource(ints = {10,20,40})
void parameterizedTest(@ConvertWith(StudyConverter.class) Study study) {
    System.out.println("message = " + study);
}

static class StudyConverter extends SimpleArgumentConverter {

    @Override
    protected Object convert(Object o, Class<?> aClass) throws ArgumentConversionException {
        Assert.assertEquals("can only convert to Study class",Study.class, aClass);
        return new Study(Integer.parseInt(o.toString()));
    }
}
class 를 인자로 넣어주면 Converting 해주는 메소드를 구현해줘야한다.
@DisplayName("스터디 만들기")
@ParameterizedTest(name = "{index} {displayName} message = {0} ")
@CsvSource({"10, 'java study'" , "20, 'spring'"})
void parameterizedTest(@AggregateWith(StudyAggregator.class) Study study) {
    System.out.println("message = " + study);
}
static class StudyAggregator implements ArgumentsAggregator {

    @Override
    public Object aggregateArguments(ArgumentsAccessor argumentsAccessor, ParameterContext parameterContext) throws ArgumentsAggregationException {
        Study study = new Study(argumentsAccessor.getInteger(0),argumentsAccessor.getString(1));
        return study;
    }
}
CsvSource를 통해 받아온 여러 인자값들을 하나로 합쳐서 받고 싶은 경우 Aggregator를 만들고 적용하면 된다.
@TestInstance
@Test로 매핑된 메소드들은 각각 다른 instance에서 실행한다. 이것이 기본 전략이다.
test간에 의존성을 없애기 위해서이다.
@TestInstance(TestInstance.Lifecycle.PER_CLASS)
public class StudyTest {
Class 전략으로 가져가게 되면 @BeforeAll , @AfterAll 같은 annotation을 가진 메소드들이 더이상 static void 일 필요가 없이 그냥 void로 시작할 수 있다.
매번 메소드마다 새롭게 instance를 만들면 static 해야지만 쓸 수 있어지만 PER_CLASS로 한개의 instance에서 실행하게 되면 그럴 필요가 없는것이다.
@Test들의 실행 순서는 중요하게 생각하면 안되고 , 의존해서도 안된다. unit test 이면 서로 의존성이 존재하면 안되기 때문이다.
하지만 stateful하게 시나리오 대로 테스트를 진행하고 싶을 때도 있다.
@TestInstance(TestInstance.Lifecycle.PER_CLASS)
@TestMethodOrder(MethodOrderer.OrderAnnotation.class)
public class StudyTest {

    @RepeatedTest(value=3, name = "{displayName}, {currentRepetition}/{totalRepetitions}")
    @Order(1)
    void repeatTest(RepetitionInfo repetitionInfo) {
        System.out.println("test"+ repetitionInfo.getCurrentRepetition());
        System.out.println(repetitionInfo.getTotalRepetitions());
    }
@TestMethodOrder에서 OrderAnnotation 을 사용해서 원하는 순서를 @Order를 명시함으로 사용이 가능하다.
꼭 @PER_CLASS 전략을 가질 필요는 없다.

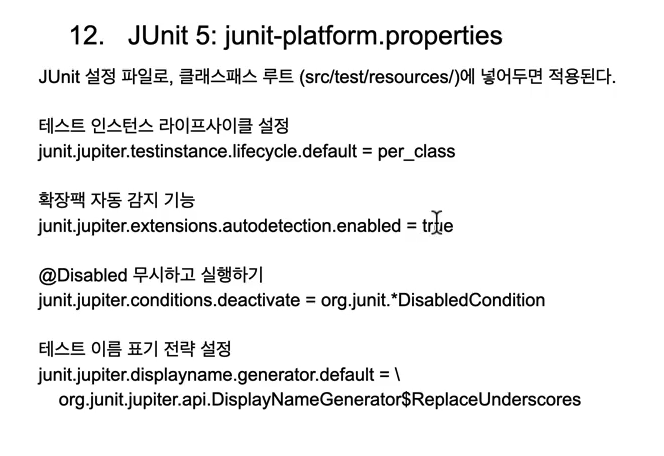
test / resources 에 junit-platform.properties로 전체 설정을 줄 수 있다.
확장팩 자동감지 보다는 아래 나오는 명시적, 프로그래밍적 으로 추가하는 것이 좋다. 원치 않는 것도 추가 될 수 있기 때문
Junit 5 확장 모델
Junit4 에서는 @RunWith(Runner) , TestRule , MethodRule 처럼 여러 확장 모델이 존재했는데 Junit5에서는 Extension 하나로 통일되었다.
public class FindSlowTestExtension implements BeforeTestExecutionCallback, AfterTestExecutionCallback {

    private static final long THRESHOLD = 1000L;
    @Override
    public void beforeTestExecution(ExtensionContext extensionContext) throws Exception {
        String testClassName = extensionContext.getRequiredTestClass().getName();
        String testMethodName = extensionContext.getRequiredTestMethod().getName();
        ExtensionContext.Store store = extensionContext.getStore(ExtensionContext.Namespace.create(testClassName, testMethodName));
        store.put("START_TIME", System.currentTimeMillis());
    }

    @Override
    public void afterTestExecution(ExtensionContext extensionContext) throws Exception {
        Method requiredTestMethod = extensionContext.getRequiredTestMethod();
        SlowTest annotation = requiredTestMethod.getAnnotation(SlowTest.class);

        String testClassName = extensionContext.getRequiredTestClass().getName();
        String testMethodName = extensionContext.getRequiredTestMethod().getName();
        ExtensionContext.Store store = extensionContext.getStore(ExtensionContext.Namespace.create(testClassName, testMethodName));
        Long start_time = store.remove("START_TIME", long.class);
        long duration = System.currentTimeMillis() - start_time;

        if (duration > THRESHOLD && annotation == null) {
            System.out.printf("Please consider marking method [%s] with @SlowTest. \n",testMethodName);
        }
    }
}
Extend 할 클래스를 작성한다. 모든 테스트전에 starttime을 context에 넣어두고 after 에서 꺼낸후에 시간을 비교하여 1초가 넘고 @SlowTest가 마킹 안되어있으면 @SlowTest로 마킹해달라 출력한다.
@ExtendWith(FindSlowTestExtension.class)
public class StudyTest {
명시적으로 @ExtendWith로 추가할 수 있다. 이러면 customizing 을 할 수 가 없다 default constructor로 생성하기 때문이다. THRESHOLD 값 같은것을 변경할 수 없음
public class StudyTest {
    @RegisterExtension
    static FindSlowTestExtension findSlowTestExtension = new FindSlowTestExtension(1);
프로그래밍적으로 선언하면 instance를 만들때 생성자를 자유롭게 사용하거나 빌더로 만들 수 있다.
JUnit5 migration
vintage engine 이 pom.xml에 있어야 JUnit4를 실행을 할 수 있다. jupyter , vintage 둘다 있으면 알아서 알맞게 실행해준다.

하지만 완벽하게 migration이 되지는 않는다.
'WEB > Java Test' 카테고리의 다른 글
| 운영 이슈 + 아키텍처 테스트 (0) | 2022.11.14 |
|---|---|
| TestContainers (1) | 2022.11.11 |
| Mockito (0) | 2022.11.11 |